Change Recessed Light To Ceiling Fan: A Complete Guide
Upgrading from a recessed light to a ceiling fan can significantly enhance your home's comfort, air circulation, and aesthetics. This guide will provide you with detailed instructions on how to perform this transformation safely and efficiently. ### Safety Considerations Before you begin any electrical work, it is crucial to ensure your safety: *Turn off the power:
Flip the circuit breaker or remove the fuse that supplies power to the light fixture. *Test for power:
Use a voltage tester to verify that no electricity is flowing to the wires. *Wear gloves and safety glasses:
Protect your hands and eyes from potential hazards. ### Materials Required To complete the installation, you will need the following materials: * New ceiling fan with mounting hardware * Electrical wire (same gauge as existing wire) * Wire connectors (wire nuts) * Screwdriver * Electrical tape * Ladder ### Step-by-Step Instructions1. Remove the Recessed Light:
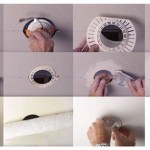
* Remove the trim around the recessed light using a screwdriver. * Disconnect the electrical wires from the light fixture. * Carefully lower the fixture out of the housing.2. Install the Ceiling Fan Mount:
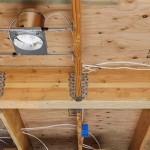
* Locate the electrical box in the ceiling. If necessary, secure the box with screws. * Attach the ceiling fan mount to the electrical box using the provided screws.3. Connect the Electrical Wires:
* Strip 1/2 inch of insulation from the ends of the electrical wires. * Connect the wires according to the manufacturer's instructions. Typically, black wires connect to black, white wires to white, and green (ground) wires to green. * Secure the wire connections with wire connectors and electrical tape.4. Hang the Ceiling Fan:
* Lift the ceiling fan onto the ceiling fan mount. * Align the ball or socket joint on the fan with the corresponding part on the mount. * Carefully lower the fan until it is securely seated.5. Install the Blades:
* Attach the provided ceiling fan blades to the fan body according to the manufacturer's instructions. * Use the included screws to secure the blades.6. Balance the Fan:
* If the fan wobbles excessively when operating, it may need to be balanced. * Follow the manufacturer's instructions for balancing the fan using the provided balancing kit. ### Tips * Consider the size of the room and ceiling height when selecting a ceiling fan. * Choose a fan with reversible blades for both summer and winter use. * Clean the ceiling fan regularly to maintain its efficiency and appearance. * If you encounter any difficulties or electrical problems, consult a qualified electrician. ### Conclusion Replacing a recessed light with a ceiling fan is a rewarding project that can improve your home's functionality and style. By following the steps outlined in this guide and adhering to safety precautions, you can successfully complete this transformation and enjoy the benefits of a comfortable and well-ventilated space.
Convert Recessed Light To Ceiling Fan Thecanconverter

Convert Recessed Light To Ceiling Fan Thecanconverter

Recessed Light Fixture Attempt Replacing Fan R Diwhy

4 Ways To Replace A Light Bulb In Ceiling Fan Wikihow

4 Ways To Replace A Light Bulb In Ceiling Fan Wikihow

6 In Recessed Light Conversion Kit White Can Converter R56

Color Changing Recessed Lights 6 Steps With Pictures Instructables

Easy Ways To Replace An Led Recessed Light Bulb 13 Steps

Ceiling Fan With Downlights Faq Lumera Living

Replacing A Ceiling Fan Light With Regular Fixture Jlc
Related Posts