How to Install a Fluorescent Flush Mount Ceiling Light
Fluorescent flush mount ceiling lights are a great way to add bright, even lighting to any room. They are relatively easy to install, and can be completed in a few simple steps. Here is a step-by-step guide on how to install a fluorescent flush mount ceiling light:
Step 1: Gather Your Materials
Before you begin, you will need to gather the following materials:
- Fluorescent flush mount ceiling light
- Screwdriver
- Wire cutters
- Electrical tape
- Safety glasses
Step 2: Turn Off the Power
Before you begin any electrical work, it is important to turn off the power to the circuit that you will be working on. This can be done by flipping the circuit breaker or removing the fuse.
Step 3: Remove the Old Light Fixture
If there is an existing light fixture in place, you will need to remove it before you can install the new one. To do this, simply unscrew the mounting screws and disconnect the wires.
Step 4: Install the Mounting Bracket
The mounting bracket is the part of the light fixture that will attach it to the ceiling. Hold the mounting bracket up to the ceiling and mark the location of the mounting holes. Drill pilot holes at the marked locations, and then insert the mounting screws.
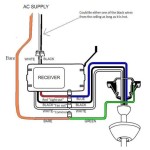
Step 5: Connect the Wires
Next, you will need to connect the wires from the light fixture to the wires from the ceiling. The black wire from the light fixture should be connected to the black wire from the ceiling, the white wire from the light fixture should be connected to the white wire from the ceiling, and the ground wire from the light fixture should be connected to the ground wire from the ceiling. Use wire nuts to secure the connections, and then wrap them with electrical tape.
Step 6: Install the Light Fixture
Once the wires are connected, you can install the light fixture. Simply lift the light fixture up to the mounting bracket and twist it into place.
Step 7: Turn On the Power
Once the light fixture is installed, you can turn on the power and test the light. If the light does not turn on, check the connections to make sure that they are secure.
Tips
- If you are not comfortable working with electricity, it is best to hire a qualified electrician to install the light fixture for you.
- Be sure to wear safety glasses when working with electricity.
- Turn off the power to the circuit before you begin any electrical work.
- Make sure that the wires are connected correctly before you turn on the power.

How To Replace An Old Fluorescent Light Fixture Young House Love

How To Replace A Fluorescent Light With An Led Flush Mount Kitchen Update Tutorial Create Enjoy

How To Replace An Old Fluorescent Light Fixture Young House Love

Surface Mounted Light Fixture 00043168524780 Ge Lighting Recessed Ceiling Led Fluorescent

Commercial Electric 32 In Low Profile Oval Oil Rubbed Broe Color Selectable Led Flush Mount Ceiling Light W Night Feature 56587111 The Home Depot

What Do You Need To Know About Flush Mount Lighting Ledmyplace

Commercial Electric 48 In X 10 Low Profile Brushed Nickel Color Selectable Led Flush Mount Ceiling Light W Night Feature 56703113 The Home Depot

Commercial Electric 4 Ft Vintage Inspired Oil Rubbed Broe Selectable Led Flush Mount Ceiling Light 3600 Lumens 3000k 4000k 5000k 54486111 The Home Depot

Lithonia Lighting Cambridge 4 Ft Oak Led Flush Mount Fmfl 30840 Caml Oa The Home Depot

Allen Roth Phoebe 48 In Black Led Flush Mount Light The Lighting Department At Com
Related Posts