Downlight Ceiling Surround Replacement: Essential Aspects
Downlights are an integral part of modern lighting design, providing focused illumination and a sleek aesthetic. However, over time, their ceiling surrounds may become damaged or outdated, necessitating replacement. This guide will explore the essential aspects of downlight ceiling surround replacement, ensuring a seamless and successful upgrade.
Compatibility Assessment
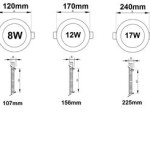
Prior to replacement, it is crucial to determine the compatibility of the new surround with the existing downlight fitting. Consider the diameter, cut-out size, and mounting mechanism of the surround to ensure it aligns perfectly with the downlight.
Material Selection
Surrounds come in various materials, including aluminum, plastic, and plaster. Aluminum offers durability and is suitable for recessed downlights, while plastic is a cost-effective option for surface-mounted fixtures. Plaster surrounds blend seamlessly with ceilings and are ideal for downlights installed in plasterboard or drywall.
Color and Finish
The color and finish of the surround can significantly impact the overall look and feel of the space. White surrounds are versatile and complement most interiors, while black surrounds provide a bold and contemporary aesthetic. Other finishes, such as brushed nickel or chrome, can enhance the fixture's appearance.
Mounting Method
Downlight surrounds can be mounted using different methods, including spring-clips, screws, or magnetic attachments. Spring-clips are quick and easy to install, while screws provide a more secure hold. Magnetic attachments offer flexibility, allowing for easy removal and repositioning.
Trim Options
Some downlight surrounds come with trim options, such as bezels or diffusers. Bezels provide an elegant frame around the downlight, while diffusers can soften the light output and reduce glare. These options can enhance the style and functionality of the downlight.
Installation Process
Before installing the new surround, ensure the power supply to the downlight is disconnected. Remove the old surround carefully, taking note of any wires or connections. Align the new surround with the downlight and secure it according to the specified mounting method. Reconnect the power and test the downlight to ensure proper functionality.
Conclusion
Downlight ceiling surround replacement is a straightforward task that can revitalize the appearance and functionality of your lighting. By carefully considering the compatibility, material, color, mounting method, trim options, and installation process, you can ensure a seamless and successful upgrade. With a new ceiling surround, your downlights will shine brighter and enhance the ambiance of your space.

Down Light Ceiling Surround Replacement For Use With Gu10 Bulbs Caravan Camper
Lightklip Downlight Surround Repair Bezel Pack For 5 Lights Diy Solution To Of

Downlight Spotlight Surrounds Bobo Bob

Downlights Or Ceiling Mounted Lights The Local Electrician

Small Interior Bedroom Dimmable Recessed Ceiling Lights Manufacturer

Large Spotlight Hole Converter Recessed Ceiling Gu10 Downlight Replace R63 R80 7 00 Pic

Zuma Lumisonic Ceiling Speaker Downlight Each World

2x Ceiling Light Cylinder Led Downlight Fixtures For Office Decoration Ca

8 Recessed Lighting Installation Tips For Diyers Bob Vila
Installation Downlight Removal And Leroy Merlin South
Related Posts

