Replacing a Ceiling Light Switch
Ceiling light switches are an essential part of any home's electrical system, allowing you to control the lighting in a room. Over time, these switches can become worn out or damaged, requiring replacement. Replacing a ceiling light switch is a relatively simple task that can be completed in a few steps.
Tools and Materials
Before you begin, you will need to gather the following tools and materials:
- New ceiling light switch
- Phillips head screwdriver
- Electrical tape
- Wire strippers
Safety Precautions
Before you start working on the electrical system, it is important to take some safety precautions:
- Turn off the power to the light switch at the circuit breaker or fuse box.
- Test the switch to make sure it is off by flipping it up and down.
- Wear rubber-soled shoes to prevent electric shock.
Removing the Old Switch
Once you have taken safety precautions, you can begin removing the old switch:
- Remove the faceplate of the switch by unscrewing the screws that hold it in place.
- Unscrew the two screws that hold the switch in place and pull it out of the electrical box.
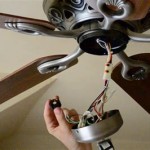
- Disconnect the wires from the switch by unscrewing the terminal screws. Note the position of each wire so that you can connect them correctly to the new switch.
Installing the New Switch
Now you can install the new switch:
- Connect the wires to the new switch by wrapping them around the terminal screws and tightening them down.
- Push the new switch into the electrical box and screw it in place.
- Install the faceplate and turn on the power at the circuit breaker or fuse box.
Testing the New Switch
Once the new switch is installed, test it to make sure it is working properly:
- Flip the switch up and down to turn the light on and off.
- Check for any loose connections or sparks.
Troubleshooting
If the new switch does not work properly, there may be a problem with the connection. Check the following:
- Make sure that the wires are securely connected to the terminal screws.
- Check for any loose connections in the electrical box.
- Replace the switch if it is damaged.
Conclusion
Replacing a ceiling light switch is a relatively simple task that can be completed in a few steps. By following the instructions in this article, you can safely and easily replace a ceiling light switch in your home.

Replacing A Ceiling Fan Light With Regular Fixture Jlc

Replacing A Ceiling Fan Light With Regular Fixture Jlc

Replace Light Fixture W Ceiling Fan R Askanelectrician

Wiring A Ceiling Fan And Light With Diagrams Ptr

How To Install A One Way Light Switch Socketsandswitches Com

How To Install A One Way Light Switch Socketsandswitches Com

How To Wire A Ceiling Fan Light Switch Quora

How To Fix A Paddle Ceiling Fan Light Switch Today S Homeowner

Wiring A Ceiling Fan And Light With Diagrams Ptr

Help Replacing Ceiling Light Switch R Diy
Related Posts