Essential Aspects of Harbor Breeze Crosswinds Ceiling Fan Instructions
Installing and operating a Harbor Breeze Crosswinds ceiling fan is a relatively simple task that can be completed in a matter of hours. However, it's important to carefully follow the instructions to ensure proper installation and operation.
Here are some essential aspects of the Harbor Breeze Crosswinds ceiling fan instructions:
1. Safety Precautions
Before you begin installing the ceiling fan, it is important to read and understand the safety precautions. These precautions include:
- Turn off the power at the circuit breaker or fuse box before installing the fan.
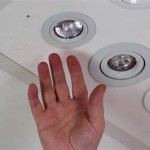
- Make sure the mounting surface is capable of supporting the weight of the fan.
- Use only the hardware provided with the fan.
- Do not operate the fan without the blades installed.
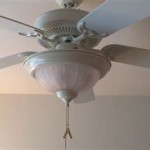
2. Assembly
The Crosswinds ceiling fan comes with all of the necessary hardware for assembly. The instructions will guide you through the process of assembling the fan, including attaching the blades, motor housing, and canopy.
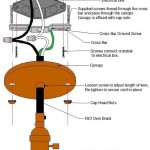
3. Installation
Once the fan is assembled, it is ready to be installed. The instructions will guide you through the process of mounting the fan to the ceiling, connecting the electrical wires, and securing the canopy.
4. Operation
Once the fan is installed, you can operate it using the included remote control. The remote control allows you to turn the fan on and off, adjust the fan speed, and set the timer.
5. Maintenance
The Crosswinds ceiling fan requires minimal maintenance. However, it is important to clean the fan blades regularly to prevent dust build-up. You should also periodically check the electrical connections to ensure they are secure.
6. Troubleshooting
If you encounter any problems with the operation of your Crosswinds ceiling fan, you can troubleshoot the problem using the instructions. The instructions provide troubleshooting tips for common problems, such as the fan not turning on or the blades wobbling.
7. Warranty
The Crosswinds ceiling fan comes with a limited lifetime warranty. The warranty covers defects in materials and workmanship. To register your warranty, you will need to complete the warranty registration card and mail it to Harbor Breeze.
By following the Harbor Breeze Crosswinds ceiling fan instructions, you can ensure the safe and proper installation and operation of your fan.

Harbor Breeze Crosswinds Ii 40821 Manual Manualslib

Harbor Breeze Crosswinds 52 In Brushed Nickel Ceiling Fan With Light Kit And Remote 5 Blade At Com

Harbor Breeze Crosswinds 52 In White Indoor Downrod Or Flush Mount Ceiling Fan With Light Remote 5 Blade At Com

Harbor Breeze Crosswinds 52 In Brushed Nickel Indoor Downrod Or Flush Mount Ceiling Fan With Light Remote 5 Blade At Com

Harbor Breeze Undefined At Com

Harbor Breeze 40678 Instruction Manual Manualslib

Hunter Swanson 44 In Integrated Led Indoor Fresh White Ceiling Fan With Glass Bowl 50905 The Home Depot

Hunter Promenade 54 In Gloss Black Led Indoor Downrod Or Flush Mount Ceiling Fan With Light Remote 5 Blade The Fans Department At Com

Harbor Breeze 40016 Manual Manualslib

Prominence Home 50659 35 Elk Mountain Farmhouse 52 Inch Brushed Nickel Indoor Ceiling Fan Led Bowl Light With Barnwood Tumbleweed Blades Com
Related Posts