How to Fit Lights in Ceiling: A Comprehensive Guide
Installing ceiling lights is an essential task for any homeowner. Whether you're upgrading your existing lighting or fitting a new one, this comprehensive guide will walk you through every step of the process, ensuring a safe and successful installation.
Step 1: Gather Tools and Materials
Before you start, gather the following tools and materials:
- Ceiling light fixture
- Screwdriver (Phillips head or flat head, depending on screws)
- Wire strippers
- Electrical tape
- Step ladder
- Safety glasses
Step 2: Safety Precautions
Before handling any electrical work, ensure safety by:
- Turning off the power to the circuit at the main electrical panel.
- Verifying the power is off using a voltage tester.
- Wearing safety glasses to protect your eyes from debris.
Step 3: Remove Old Fixture (If Applicable)
If you're replacing an existing ceiling light, follow these steps:
- Gently pull down on the light fixture to detach it from the ceiling.
- Disconnect the wires by unscrewing the wire nuts and separating the wires.
- Remove the mounting bracket or screws holding the fixture in place.
Step 4: Prepare Wires
Prepare the wires for the new light fixture:
- Remove any insulation from the ends of the wires using wire strippers.
- Twist the exposed wires together to form secure connections.
- Wrap electrical tape around the twisted wires to insulate them.
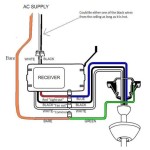
Step 5: Connect Wires
Connect the prepared wires to the light fixture:
- Match the colors of the wires (typically black to black, white to white, and green to bare copper).
- Twist the corresponding wires together and secure them with wire nuts.
- Ensure the connections are tight and insulated.
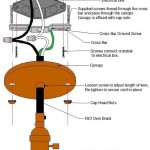
Step 6: Mount Light Fixture
Mount the light fixture to the ceiling:
- Align the fixture with the wires and mounting bracket.
- Screw the fixture into place using the provided screws or bolts.
- Tighten the screws securely without overtightening.
Step 7: Install Bulbs
Install the light bulbs into the sockets:
- Choose bulbs that are compatible with the light fixture and wattage requirements.
- Gently push or twist the bulbs into the sockets until they are securely in place.
- Ensure the bulbs are facing the correct direction.
Step 8: Restore Power
Once everything is installed, restore power to the circuit at the main electrical panel.
Step 9: Test Light Fixture
Turn on the light switch to test the fixture:
- Ensure all bulbs are illuminating properly.
- Check for any flickering or buzzing sounds.
- If any issues arise, turn off the power and consult a qualified electrician.
Additional Tips
- Use a level to ensure the light fixture is mounted straight.
- If the ceiling joists are not exposed, use a stud finder to locate them.
- If you are unsure about any part of the installation, consult an electrician.
- Regularly inspect and clean the light fixture to maintain its performance and safety.
By following these steps carefully, you can successfully fit ceiling lights and enhance the ambiance and functionality of your living space.

How To Install Ceiling Light Homeserve Usa

6 Steps How To Install Led Strip Lights On Ceiling

Mounting Light Fixtures Fine Homebuilding

How To Install A Ceiling Light Fixture Diy Family Handyman

How To Install A Lighting Fixture Forbes Home

How To Install A Ceiling Light Fixture Diy Family Handyman

How To Replace Install A Light Fixture The Art Of Manliness

How To Install Recessed Lighting Fixthisbuildthat

Simple Ways To Fit Downlights 15 Steps With Pictures Wikihow

How To Install Led Flat Panel Light Ox Lighting
Related Posts

