Essential Aspects of Replacing a Ceiling Fixture Box
Replacing a ceiling fixture box is a crucial task that ensures the safety and functionality of your lighting fixtures. It involves a thorough understanding of electrical codes, safety measures, and the proper tools and materials. This article explores the essential aspects of replacing a ceiling fixture box, providing a comprehensive guide for homeowners looking to tackle this task safely and effectively.
Safety First: Considerations and Precautions
Before starting any electrical work, it is paramount to prioritize safety. Turn off the electricity at the breaker panel to prevent any shocks or accidents. Wear appropriate safety gear, including gloves and safety glasses. Ensure you have a non-conductive ladder for stability and use caution when handling electrical components.
Assessing the Fixture Box: Identifying Issues and Types
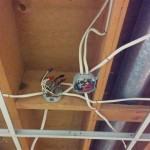
Inspect the existing fixture box to determine its condition. Look for signs of damage, rust, or loose connections. Different types of fixture boxes exist, including octagonal boxes, round boxes, and remodel boxes. Choose the appropriate replacement box based on the size and shape of the fixture you intend to install.
Proper Installation: Step-by-Step Guide
Follow these steps to replace the ceiling fixture box safely and securely: - Remove the old fixture and disconnect the wires carefully. - Cut the electrical wires, leaving enough length for splicing. - Strip the ends of the wires and connect them to the new fixture box using wire nuts or electrical tape, ensuring a secure and insulated connection. - Mount the new fixture box to the ceiling joists or studs using appropriate screws or nails. - Tuck the wires neatly into the box and secure the fixture. - Reinstall the light fixture and turn on the electricity to test the new installation.
Troubleshooting Potential Issues
In case of any issues or malfunctions, troubleshoot potential problems: - Check the electrical connections again to ensure they are secure and not loose. - Inspect the wires for any damage or breaks. - Ensure the new fixture box is compatible with the light fixture and is the correct size. - If the light fixture still does not work, seek professional assistance from a qualified electrician.
Conclusion: Ensuring Safety and Functionality
Replacing a ceiling fixture box requires careful attention to safety, proper installation techniques, and troubleshooting potential issues. By understanding the essential aspects outlined in this guide, homeowners can confidently undertake this task, ensuring the safe and efficient operation of their lighting fixtures. If any doubts or concerns arise, seeking professional help from a licensed electrician is always advisable.
:strip_icc()/102160203-3147dc9a4cb14fdf8aca26c67b27be45.jpg?strip=all "How To Install A Ceiling Fan Electrical Box")
How To Install A Ceiling Fan Electrical Box

How To Remove Replace This Ceiling Junction Box R Askanelectrician

How To Remove Replace This Ceiling Junction Box R Askanelectrician

How To I Replace This Ceiling Electrical Box With Wiring That Ties It Into The R Askelectricians

How To Change A Light Fixture

Can This Electrical Box Hold A 23lb Ceiling Fan R Askanelectrician

How To Install A Light Fixture The Home Depot

How To Install A Ceiling Light Fixture Diy Family Handyman

How To Install A Ceiling Light Fixture Diy Family Handyman
/installing-a-pendant-light-2175009-Hero-01-67e2c0e1580f45b39d30a6b9497140a9.jpg?strip=all "How To Install A Pendant Light")
How To Install A Pendant Light
Related Posts