Replacing a Bathroom Ceiling Fan with Light: A Comprehensive Guide
Replacing a bathroom ceiling fan with light is a task that can be both rewarding and practical. Whether you're updating the look of your bathroom or improving its functionality, this guide will provide you with all the essential information and step-by-step instructions to complete the job safely and efficiently.
Step 1: Safety Precautions
Before you begin any electrical work, it's crucial to ensure safety. Turn off the power to the bathroom at the circuit breaker or fuse box. Wear safety glasses and gloves to protect yourself from potential hazards.
Step 2: Gather Tools and Materials
You will need the following tools and materials:
- Replacement ceiling fan with light
- Screwdriver (Phillips and flathead)
- Wire strippers or cutters
- Electrical tape or wire nuts
- Step ladder or stool
Step 3: Remove the Old Fan
1. Carefully remove the fan cover.
2. Disconnect the electrical wires by unscrewing the wire nuts or cutting the wires with wire strippers.
3. Remove the mounting brackets that hold the fan to the ceiling box.
4. Gently lower the fan from the ceiling and set it aside.
Step 4: Prepare the Mounting Box
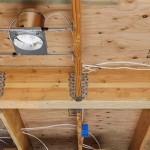
1. Inspect the ceiling box to ensure it is securely attached to the ceiling. If necessary, tighten any loose screws.
2. If the existing wires are short, you may need to extend them using wire nuts or electrical tape. Ensure the connections are secure and insulated.
Step 5: Install the New Fan
1. Lift the new fan into place and align it with the mounting brackets.
2. Secure the fan to the mounting brackets by tightening the screws.
3. Connect the electrical wires to the corresponding wires on the fan. Twist the wires together and secure them with wire nuts or electrical tape.
Step 6: Reinstall the Fan Cover
1. Place the fan cover over the fan and align the screw holes.
2. Tighten the screws to secure the cover in place.
Step 7: Restore Power and Test
1. Turn on the power to the bathroom at the circuit breaker or fuse box.
2. Switch on the fan and light to ensure they are working properly.
3. Adjust the fan speed and light settings as desired.
Tips:
- If you encounter any difficulties, consult an electrician for assistance.
- Consider the ventilation needs of your bathroom when selecting a fan.
- Choose a fan with optional features such as a built-in night light or remote control.
- Check the fan blades for balance after installation to prevent rattling or wobbling.

Install A New Bathroom Vent Fan Light The San Fernando Valley Sun

How To Install A Bathroom Fan With Bluetooth Speakers Fixthisbuildthat

Should I Install A Bathroom Heater Fan Light Combo
Replacing A Ceiling Fan Light With Regular Fixture Jlc

How To Replace A Ceiling Fan Light Kit Smafan Com

How To Install A Bathroom Fan Step By Guide Bob Vila

Bathroom Exhaust Fan Guide

Replacement Bathroom Exhaust Fan And Heat Lamp R Homemaintenance

Installing An Exhaust Fan During A Bathroom Remodel Greenbuildingadvisor

How To Install A Bathroom Fan With Bluetooth Speakers Fixthisbuildthat
Related Posts


