Hunter Ceiling Fan Glass Shade Replacement: Your Ultimate Guide
Hunter ceiling fans are renowned for their superior quality and elegant designs. However, over time, their glass shades may become damaged, discolored, or simply outdated. Replacing the glass shade can not only restore the fan's aesthetics but also improve its functionality by allowing more light to pass through. Here's a comprehensive guide to help you navigate the essential aspects of Hunter ceiling fan glass shade replacement:
1. Determine the Shade Type and Size
Hunter ceiling fans come with various glass shade styles and sizes. It's crucial to identify the correct type and size of shade for your specific model. Consult the user manual or visit the manufacturer's website to verify the dimensions and shape. You may also want to consider the overall decor of the room to choose a shade that complements the existing design scheme.
2. Safety Precautions
Before starting the replacement process, ensure the fan is turned off and the power supply is disconnected. This is a vital safety measure to prevent electrical shock. Additionally, wear safety glasses and gloves to protect your eyes and hands from any broken glass fragments.
3. Remove the Old Shade
Depending on the fan model, glass shades are typically held in place by screws or clips. Locate the screws and carefully remove them using a screwdriver. Alternatively, if your fan uses clips, gently pry them open with a flat-head screwdriver or a putty knife. Once the screws or clips are removed, the glass shade can be lifted off the fan.
4. Clean the Fan Base
Once the old glass shade is removed, take the opportunity to clean the fan base thoroughly. Use a damp cloth to wipe away any dust or debris that may have accumulated. This will ensure a secure and stable fit for the new shade.
5. Install the New Shade
Carefully align the new glass shade over the fan base. If the fan uses screws, insert them into the designated holes and tighten them securely using a screwdriver. If clips are used, press them back into place until they snap securely into position. Double-check that the shade is firmly attached and does not wobble.
6. Reconnect the Power and Check Functionality
Once the new glass shade is installed, reconnect the power supply and turn the fan back on. Allow a few minutes for the fan to operate and check that the light shines evenly through the new shade. If there are any flickerings or unusual noises, consult the user manual or seek professional assistance.
Conclusion
Hunter ceiling fan glass shade replacement is a straightforward process that can greatly enhance the appearance and functionality of your fan. By following the steps outlined in this guide, you can confidently complete the task and enjoy a renewed ceiling fan that complements the style of your home for years to come.

Hunter 6 In X 14 Bowl White Linen Clear Glass Ceiling Fan Light Shade With 2 1 4 Set Crew Fitter The Shades Department At Com

Builder Deluxe With Light 52 Inch Ceiling Fan Hunter

Hunter K712001045 Replacement Glass Shade For Kenbridge Build Com

Hunter 6 In X 11 Bowl Frosted Amber Stained Glass Ceiling Fan Light Shade With 2 1 4 Reflector Fitter The Shades Department At Com

Hunter Ceiling Fan Replacement 3 Globes Shades Clear Lined Beaded

Replacement Glass Shades For Hunter Fans Fan

Fremont Low Profile With Light Maple Blades 52 Inch Ceiling Fan Hunter

Hunter Ceiling Fan Replacement Globes Shades 4 Lined Beaded Clear

Hunter 6 In X 14 Bowl White Linen Clear Glass Ceiling Fan Light Shade With 2 1 4 Set Crew Fitter The Shades Department At Com

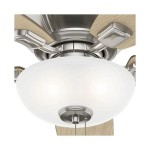
Hunter Newsome 52 In Indoor Brushed Nickel Bowl Light Kit Low Profile Ceiling Fan 53315 The Home Depot

