Installing Recessed Lights in an Existing Ceiling: A Comprehensive Guide
Recessed lighting offers a sophisticated and energy-efficient way to illuminate your home. Installing recessed lights in an existing ceiling requires careful planning and execution. Here's a comprehensive guide to help you achieve professional-looking results:
Assessment and Planning
Start by assessing the existing ceiling and electrical system. Determine the locations of joists or studs to ensure proper support for the lights. Check the circuit capacity to ensure it can handle the additional load. Sketch a layout of the proposed lighting, including the number, spacing, and aiming of the fixtures.
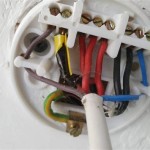
Electrical Preparation
Turn off the power at the electrical panel and verify it with a voltage tester. Run electrical wires from the existing circuit to each recessed light junction box. Ensure proper wire connections and secure them with wire nuts or terminal blocks. Test the wiring for continuity before proceeding.
Hole Cutting
Use a hole saw of the appropriate size (typically 5-6 inches) and a drill to cut holes in the ceiling for the recessed lights. Ensure the holes are centered over the joists or studs for support. Clean the cut edges of the holes to remove any debris.
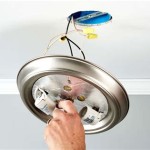
Installing the Housing
Insert the recessed light housing into the prepared holes. Adjust the spring-loaded clips to secure the housing in place. Connect the electrical wires to the housing terminals and tighten the screws. Ensure the wires are fully inserted and not pinched.
Insulating and Air Sealing
Place insulation around the recessed light housing, leaving a gap between the insulation and the fixture to prevent overheating. Seal any gaps around the housing with expanding foam or caulk to prevent air leaks and improve energy efficiency.
Installing the Trim
Choose recessed light trims that complement your décor and provide the desired light distribution. Insert the trim into the housing, securing it with retaining springs or clips. Ensure the trim is level and flush with the ceiling surface.
Restoring the Ceiling
If the ceiling is textured, apply a thin layer of joint compound around the recessed lights and spread it evenly to blend with the surrounding ceiling. Allow it to dry and sand it smooth. Paint the ceiling to achieve a uniform finish.
Tips for Success
- Identify the location of joists or studs accurately to avoid drilling into them.
- Use a sharp hole saw and apply moderate pressure to make clean cuts.
- Connect the electrical wires securely and avoid overtightening the screws.
- Ensure proper insulation and air sealing to prevent overheating and air leaks.
- Test the lights before restoring the ceiling to confirm proper operation.
Installing recessed lights in an existing ceiling requires attention to detail and careful execution. By following these steps, you can achieve professional-looking results that will enhance the ambiance of your home.

How To Install Recessed Lighting Fixthisbuildthat

Energy Star Ask The Experts S

Installing Recessed Lights This Old House

How To Seal Recessed Light Fixtures For Energy Efficiency Today S Homeowner

How To Properly Install The Smart Recessed Lights Lumary

An Easy Inexpensive Way To Replace Your Old Recessed Lights With No Rewiring Making It In The Mountains

Easy Ways To Replace An Led Recessed Light Bulb 13 Steps

Install Recessed Lighting In Your Home Office

Installing Led Wafer Lighting All About The House
Related Posts