Essential Aspects of Ceiling Light Mounting Hardware
Ceiling light fixtures are an integral part of any home's lighting system, providing illumination and enhancing the overall ambiance. Proper installation of these fixtures is crucial for both safety and aesthetics. Ceiling light mounting hardware plays a vital role in ensuring a secure and functional installation.
The type of mounting hardware required depends on the weight of the fixture and the type of ceiling it will be mounted on. For heavier fixtures, a stronger mounting system will be necessary, such as a ceiling box or canopy mount. If the ceiling is made of drywall, toggle bolts or butterfly anchors may be appropriate. For more detailed information on choosing the right mounting hardware, refer to the manufacturer's instructions or consult with a qualified electrician.
When selecting ceiling light mounting hardware, there are several key aspects to consider:
- Weight Capacity: The mounting hardware must be able to support the weight of the fixture securely. Check the manufacturer's specifications to determine the weight capacity of the hardware and ensure it exceeds the weight of the fixture.
- Ceiling Type: Different ceiling types require different types of mounting hardware. Drywall ceilings typically use toggle bolts or butterfly anchors, while plaster ceilings may require molly bolts or threaded inserts. Suspended ceilings have their own specific mounting systems.
- Fixture Style: The mounting hardware should complement the style of the fixture. For example, a decorative canopy mount can enhance the aesthetics of a chandelier, while a simple bracket may be more suitable for a modern pendant light.
- Electrical Compatibility: Ensure that the mounting hardware is compatible with the electrical wiring in your home. The hardware should be UL-listed and meet all safety standards.
Once the appropriate mounting hardware has been selected, it is essential to follow proper installation procedures. Safety should always be a top priority:
- Turn off the Power: Before beginning any electrical work, turn off the power supply to the circuit that the light fixture will be installed on.
- Use Appropriate Tools: Use the correct tools for the job, such as a drill, screwdriver, and level. Refer to the manufacturer's instructions for specific tool requirements.
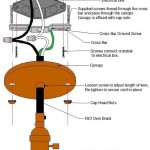
- Secure the Mounting Hardware: Ensure that the mounting hardware is securely attached to the ceiling. Tighten all screws and bolts firmly, but avoid over-tightening.
- Connect the Electrical Wiring: Connect the electrical wiring of the fixture to the wiring in the ceiling. Follow the manufacturer's instructions carefully and use wire nuts or other approved connectors.
- Test the Fixture: Turn on the power and test the fixture to ensure that it is working properly.
By carefully considering the essential aspects of ceiling light mounting hardware and following proper installation procedures, you can ensure a safe and aesthetically pleasing lighting system in your home.

Mounting Light Fixtures Fine Homebuilding

Mounting Light Fixtures Fine Homebuilding

Uxcell Ceiling Light Plate Lighting Fixture Mounting Bracket 4 1 X0 71 67 L W H 8pcs Com

Portfolio 4 Offset Swivel Crossbar At Com

Lighting Hardware Accessories At Menards

Commercial Electric 4 In Offset Swivel Crossbar 81745 The Home Depot

Uxcell 145mm Ceiling Light Plate Kit Chandelier Lighting Fixture Mounting Bracket Hardware Com

Vintage Hardware Lighting 222 Series Close Ceiling Light Mounting Kit 2l Pb

Whole Iron Ceiling Light Fixture Mounting Bracket Pandahall Com

Uxcell 145mm Ceiling Light Plate Kit Chandelier Lighting Fixture Mounting Bracket Hardware Com
Related Posts


