How to Change a Ceiling Fan Light Socket
Changing a ceiling fan light socket is a relatively simple task that can be completed in a few minutes. Follow these steps to safely and effectively replace the socket:
Step 1: Gather Your Tools and Materials
Before you begin, gather the following tools and materials:
- New light socket
- Screwdriver (Phillips or flathead, depending on the socket)
- Electrical tape
- Wire stripper
- Safety glasses (optional)
Step 2: Turn Off the Power
For safety, it is essential to turn off the power to the ceiling fan before starting any work. Go to your home's electrical panel and locate the breaker or fuse that controls the fan's power. Turn the breaker off or remove the fuse.
Step 3: Remove the Light Fixture
Locate the screws that secure the light fixture to the ceiling fan. These screws are usually located on the bottom of the fixture. Remove the screws and carefully lower the light fixture.
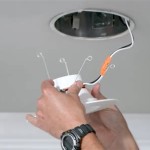
Step 4: Disconnect the Wires
Once the light fixture is removed, you will see the wires that are connected to the socket. Note the color of each wire and how it is connected to the socket.
Use a screwdriver to loosen the terminal screws on the socket. Disconnect the wires from the socket and wrap them with electrical tape to prevent short circuits.
Step 5: Remove the Old Socket
After the wires are disconnected, you can remove the old socket from the ceiling fan. Most sockets are held in place by one or two screws. Remove the screws and carefully pull the socket out of the fan.
Step 6: Install the New Socket
Align the new socket with the hole in the ceiling fan and insert it into place. Secure the socket with the screws that you removed in Step 5.
Step 7: Connect the Wires
Connect the wires to the new socket, matching the colors of the wires to the terminals on the socket. Tighten the terminal screws to secure the wires.
Step 8: Reinstall the Light Fixture
Carefully lift the light fixture and align it with the mounting plate on the ceiling fan. Secure the light fixture with the screws that you removed in Step 3.
Step 9: Turn On the Power
Return to your home's electrical panel and turn the breaker back on or replace the fuse. The ceiling fan light should now be working properly.
Note: If you are not comfortable working with electrical circuits, it is recommended to hire a qualified electrician to perform this task for you.

Replacing A Ceiling Fan Light With Regular Fixture Jlc

Replacing A Ceiling Fan Light With Regular Fixture Jlc

Ceiling Fan Light Fixture Replacement Ifixit Repair Guide

4 Ways To Replace A Light Bulb In Ceiling Fan Wikihow

4 Ways To Replace A Light Bulb In Ceiling Fan Wikihow

How To Replace A Ceiling Fan Light Kit

Ceiling Fan Light Fixture Replacement Ifixit Repair Guide

How To Replace A Light Fixture With Ceiling Fan Projects By Peter

How To Replace A Ceiling Fan Light Socket Doityourself Com

Ceiling Fan Light Fixture Replacement Ifixit Repair Guide
Related Posts