How to Replace a Light Socket in a Ceiling
Replacing a light socket in a ceiling may seem like a daunting task, but it is actually quite simple with the right tools and a little bit of know-how. Here is a step-by-step guide to help you get the job done safely and efficiently:
Step 1: Gather Your Tools and Materials
Before you begin, you will need to gather the following tools and materials:
- Replacement light socket
- Screwdriver
- Electrical tape
- Wire strippers
- Safety glasses
Step 2: Turn Off the Power
Safety first! Before you do anything, make sure to turn off the power to the circuit that controls the light socket you are replacing. You can do this by flipping the appropriate circuit breaker or removing the fuse from the fuse box.
Step 3: Remove the Old Light Socket
Once the power is off, you can remove the old light socket. To do this, simply unscrew the screws that hold it in place and carefully pull it out of the ceiling.
Step 4: Disconnect the Wires
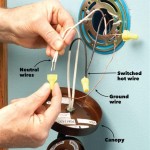
Once the light socket is removed, you will need to disconnect the wires from the old socket. To do this, use the wire strippers to strip about 1/2 inch of insulation from the ends of the wires. Then, use the screwdriver to loosen the screws that hold the wires in place and carefully pull the wires out of the old socket.
Step 5: Connect the Wires to the New Light Socket
Now it's time to connect the wires to the new light socket. To do this, simply insert the ends of the wires into the appropriate terminals on the new socket and tighten the screws to secure them. Make sure that the wires are securely fastened and that there are no loose strands.
Step 6: Wrap the Wires with Electrical Tape
Once the wires are connected, wrap them with electrical tape to insulate them and prevent them from shorting out. Start by wrapping the wires together at the point where they connect to the socket. Then, wrap the tape around the wires individually, making sure to overlap each layer by at least 50%. Leave about 1/4 inch of the wire exposed at the end of each wrap.
Step 7: Insert the New Light Socket
Now you can insert the new light socket into the ceiling. To do this, simply align the socket with the holes in the ceiling and push it into place. Once the socket is in place, tighten the screws to secure it.
Step 8: Turn on the Power and Test the Light Socket
Once the new light socket is installed, turn on the power to the circuit and test the light socket by turning on the light switch. If the light comes on, then you have successfully replaced the light socket.
Tips
- If you are not comfortable working with electricity, it is best to hire a qualified electrician to replace the light socket for you.
- Make sure that the new light socket is the same size and type as the old socket.
- Be careful not to overtighten the screws when you are securing the light socket in place.
- If you are replacing a light socket in a bathroom or other wet location, make sure to use a weatherproof light socket.
Replacing a light socket in a ceiling is a relatively simple task that can be completed in a few minutes with the right tools and materials. By following the steps outlined above, you can safely and easily replace a light socket and get your light fixture back up and running in no time.

How To Replace Install A Light Fixture The Art Of Manliness

How To Replace Install A Light Fixture The Art Of Manliness

How To Install A Light Fixture Diy Home Improvement

How To Replace A Ceiling Light Socket 13 Steps With Pictures

Mounting Light Fixtures Fine Homebuilding

Replacing A Ceiling Fan Light With Regular Fixture Jlc

How To Replace A Ceiling Light Socket 13 Steps With Pictures

How To Replace Porcelain Light Sockets Ehow

How To Replace A Ceiling Fan Light Socket Doityourself Com

How To Replace A Ceiling Light Socket 13 Steps With Pictures
Related Posts


