How to Change Recessed LED Ceiling Lights
Recessed LED ceiling lights are a popular choice for home and business owners alike due to their energy efficiency, long lifespan, and sleek appearance. While they are generally low-maintenance, there may come a time when you need to change one of these lights. Here's a step-by-step guide on how to do it safely and easily:
Safety Precautions
Before you begin, always remember to turn off the power to the light fixture at the circuit breaker panel. This is essential to prevent electrical shock.
Materials Required
Step-by-Step Instructions
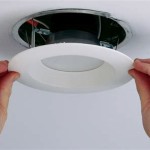
1. Remove Trims:
Locate the trim ring around the light fixture. This ring is usually held in place by springs or clips. Gently pull the trim ring down and away from the ceiling to release it.
2. Disconnect Electrical Wires:
Once the trim ring is removed, you will see two electrical wires connected to the light fixture. Use a screwdriver to loosen the screws on the wire connectors and disconnect the wires.
3. Remove Old Bulb:
Locate the base of the old LED bulb. It is typically held in place by a twist or lock mechanism. Twist or push the bulb counterclockwise to loosen it and remove it from the light fixture.
4. Inspect Socket:
Before installing the new bulb, inspect the socket to ensure that it is clean and free of any debris. Use a cotton swab or compressed air to remove any dust or dirt.
5. Install New Bulb:
Align the pins on the new LED bulb with the corresponding slots in the socket. Push the bulb into place and twist or lock it according to the manufacturer's instructions.
6. Reconnect Wires:
Reconnect the electrical wires to the bulb by tightening the screws on the wire connectors.
7. Reattach Trim Ring:
Lift the trim ring back into place and align it with the ceiling opening. Press the trim ring firmly against the ceiling to snap it into place.
8. Turn on the Power:
Return to the circuit breaker panel and turn on the power to the light fixture. Test the light to ensure that it is working properly.
Tips:

Easy Ways To Replace An Led Recessed Light Bulb 13 Steps

How To Replace Recessed Lighting With Led The Home Depot

Easy Ways To Replace An Led Recessed Light Bulb 13 Steps

How To Replace Recessed Lighting With Led The Home Depot

How To Replace Recessed Lighting With Led The Home Depot

Easy Ways To Replace An Led Recessed Light Bulb 13 Steps

Easy Ways To Replace An Led Recessed Light Bulb 13 Steps

How To Change Really Tall Recessed Ceiling Lights Quora

How To Replace Recessed Lighting With Led The Home Depot

How To Change A Recessed Light Bulb
Related Posts