Illuminate Your Home with a Rustic Mason Jar Ceiling Light DIY
Transform ordinary mason jars into charming and functional ceiling lights with this easy-to-follow DIY guide. Not only will you add a touch of rustic elegance to your home, but you'll also save money and create a personalized lighting solution. Let's get started on this exciting project!
Materials You'll Need:
- Mason jars (choose the size and shape you prefer)
- Ceiling mount light fixture with a canopy
- Electrical wire (UL-listed, appropriate gauge for your fixture)
- Wire strippers
- Electrical tape
- Drill
- 1/2" drill bit
- Screwdriver
- Light bulbs
Step-by-Step Guide:
Step 1: Prepare the Mason Jars
Drill a 1/2" hole in the center of the lid of each mason jar. This hole will allow the electrical wire to pass through.
Step 2: Attach the Jars to the Canopy
Position the mason jars on the ceiling mount canopy and mark the screw holes. Remove the jars and pre-drill pilot holes using a drill bit slightly smaller than the screws. Screw the jars firmly into place.
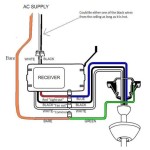
Step 3: Wire the Fixture
Cut the electrical wire to the desired length. Strip the ends of the wire about 1/2". Connect the black wire to the brass terminal on the light fixture, and the white wire to the silver terminal. Secure the connections with electrical tape.
Step 4: Install the Light Fixture
Mount the light fixture on the ceiling according to the manufacturer's instructions. Thread the wires through the canopy hole and connect them to the corresponding terminals on the fixture.
Step 5: Secure the Jars
Thread the electrical wire through the holes in the mason jar lids and tighten the lids securely onto the jars.
Step 6: Illuminate Your Space
Screw in the light bulbs and enjoy the warm and inviting glow of your newly created mason jar ceiling light. Customize the lighting effect by choosing different bulb types, such as Edison bulbs for a vintage touch.
Tips and Variations:
- Use a variety of sizes and shapes of mason jars for a unique look.
- Paint the jars in your desired color to match your decor.
- Hang the jars at different heights to create visual interest.
- Add decorative accessories, such as twine or ribbon, around the jars for a touch of whimsy.
With this simple DIY project, you can add charm and ambiance to any room in your home. Let your creativity shine as you customize your mason jar ceiling light to perfectly complement your personal style and space.

Diy Mason Jar Pendant Light Upcycle An Old Vanity Strip In Easy Steps

Diy Mason Jar Pendant Light Upcycle An Old Vanity Strip In Easy Steps
.png?strip=all "D I Y Mason Jar Chandeliers Camp Wandawega")
D I Y Mason Jar Chandeliers Camp Wandawega

Diy Mason Jar Lights 25 Best Tutorials Kits Supplies A Piece Of Rainbow

Mason Jar Chandelier Kenneth Wingard

Diy Mason Jar Chandelier East Coast Creative

Every Dining Room Needs One Of These Diy Rustic Mason Jar Light Fixtures

How To Make A Mason Jar Chandelier Diy Projects Craft Ideas S For Home Decor With

32 Diy Mason Jar Lighting Ideas

Diy Mason Jar Chandelier East Coast Creative
Related Posts