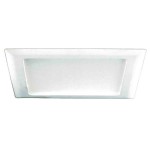
Flush Mount Ceiling Lights Installation: A Comprehensive Guide
Flush mount ceiling lights, known for their sleek and unobtrusive design, are a popular choice for illuminating a wide range of spaces. Installing these fixtures requires careful attention to detail and a systematic approach. This comprehensive guide will provide you with step-by-step instructions, safety precautions, and essential tips for a successful flush mount ceiling light installation.
Safety Precautions
Before starting any electrical work, it is crucial to prioritize safety. Ensure that the power supply to the light fixture is turned off at the electrical panel. Verify this by using a voltage tester to confirm that no electricity is flowing through the circuit.
Wear appropriate safety gear, including gloves and safety glasses, to protect yourself from potential hazards. If you are not comfortable working with electricity or encounter any difficulties during the installation process, do not hesitate to contact a qualified electrician for assistance.
Materials and Tools Required
Gather the necessary materials and tools before starting the installation. Essential items include the flush mount ceiling light fixture, mounting bracket or base, wire connectors, electrical tape, a screwdriver or drill, and a level.
Installation Steps
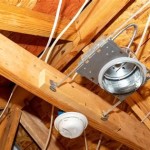
Step 1: Prepare the Mounting Bracket
Identify the mounting bracket or base that came with the light fixture. Connect the bracket to the electrical box using the included screws. Ensure that the bracket is level and securely fastened.
Step 2: Connect the Wires
Identify the wires coming from the electrical box and the light fixture. Typically, black wires are used for the hot or live terminal, white wires for the neutral terminal, and green or bare wires for the ground terminal. Strip the ends of the wires and connect them to the corresponding terminals on the fixture. Use wire connectors and electrical tape to secure the connections.
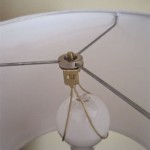
Step 3: Mount the Fixture
Carefully lift the light fixture and align it with the mounting bracket. Rotate the fixture clockwise until it engages with the bracket and becomes snug. Avoid overtightening to prevent damage to the fixture or the electrical connections.
Step 4: Install the Light Bulbs
Insert the appropriate light bulbs into the sockets provided on the fixture. Ensure that the wattage and type of bulb used are compatible with the fixture's specifications.
Step 5: Turn on the Power
Return to the electrical panel and turn on the power supply to the light fixture. Verify that the light fixture is operational and properly illuminates the space.
Tips for Successful Installation
Use a Level: Ensure that the mounting bracket and the light fixture are level before mounting to prevent uneven illumination.
Secure Connections: Tightly secure all electrical connections and use wire connectors and electrical tape to prevent loose or faulty wiring.
Test the Fixture: Before mounting the fixture permanently, briefly turn on the power to ensure that it works correctly and there are no electrical issues.
Follow the Manufacturer's Instructions: Each light fixture model may have specific installation requirements. Refer to the manufacturer's instructions for any special considerations or additional steps.
Conclusion
By following these comprehensive instructions and adhering to safety precautions, you can successfully install flush mount ceiling lights and enhance the ambiance of your space. Remember to prioritize safety, prepare properly, follow the steps meticulously, and seek professional assistance if necessary. With a little attention to detail and careful execution, you can enjoy the benefits of beautifully illuminated interiors with flush mount ceiling lights.

How To Install Outdoor Flush Mount Lights

How To Install A Semi Flush Mount Ceiling Light

Dinglilighting Led Flush Mount Ceiling Light Fixture 18w 8 86 Modern Round Flat Lighting For Kitchen Closet Garage Hallway Com

The Most Popular Flush Mount Lighting Styles To Know Ledmyplace

What Do You Need To Know About Flush Mount Lighting Ledmyplace

Next Glow Ultra Slim Luxurious Edge Lit 6 5 In Round White 4000k Led Easy Installation Ceiling Light Flush Mount 1 Pack Ng2064 The Home Depot

Home Decorators Collection Portland Court 14 In Brushed Nickel Led Flush Mount Ceiling Light 23952 The Depot

Abbey 15 Led Flush Mount Aged Brass Ceiling Lighting

Lepro 24w 13 Inch Flush Mount Ceiling Light Fixture For Bathroom Bedroom Kitchen Porch Hallway

360 Lighting Modern Ceiling Light Flush Mount Fixture 13 Wide Brushed Nickel 2 Frosted Glass Dome Shade For Bedroom Kitchen Living Room Hallway Target
Related Posts