Ceiling Can Light Conversion Kit: A Comprehensive Guide
Upgrading your existing recessed lighting to energy-efficient LED can lights is a smart and cost-effective home improvement project. With the help of a ceiling can light conversion kit, you can easily replace your old halogen or incandescent bulbs with LED can lights without the need for major electrical work.
Choosing the right ceiling can light conversion kit is crucial for a successful installation. Here are some essential aspects to consider:
Type of Can Light
There are two main types of can lights: recessed and non-recessed. Recessed can lights are installed flush with the ceiling, while non-recessed can lights protrude slightly below the ceiling.
If you have recessed can lights, you will need a conversion kit designed specifically for recessed lights. These kits typically include a trim ring that fits over the existing can housing and a light bulb adapter that allows you to install an LED bulb.
Size of Can Light
Can lights come in various sizes, typically measured in inches of diameter. The most common sizes are 4-inch, 5-inch, and 6-inch. Make sure to choose a conversion kit that is compatible with the size of your existing can lights.
Wattage and Brightness
LED bulbs are rated in wattage, which indicates their energy consumption. However, brightness is measured in lumens. A higher lumen output will produce a brighter light. When choosing an LED bulb, consider the desired brightness level for the room and the existing wattage of your halogen or incandescent bulbs.
Color Temperature
Color temperature refers to the perceived warmth or coolness of light. LED bulbs are available in a range of color temperatures, from warm white (2700-3000K) to daylight white (5000-6500K). Choose a color temperature that complements the décor and ambiance of your room.
Dimmability
If you want to be able to dim your LED can lights, make sure to choose a conversion kit and LED bulb that are both dimmable. Dimmable conversion kits will allow you to adjust the light output using a standard dimmer switch.
Installation
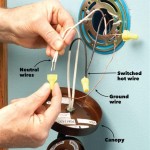
Installing a ceiling can light conversion kit is relatively straightforward. However, it is important to follow the manufacturer's instructions carefully. In most cases, the installation process involves removing the old bulb, connecting the adapter to the wires in the can housing, and attaching the trim ring.
If you are not comfortable working with electrical wiring, it is recommended to hire a licensed electrician to perform the installation.

6 In Recessed Light Conversion Kit White Can Converter R56

The Can Converter Recessed Light Conversion Kit 29518 Lamps Plus

Recessed Light Converter Kit By Recesso Lights 10570 05 Rcs215473

Westinghouse Recessed Light Converter

Model R56 5 6 Inch Can Conversion With Designer Beveled Medallion

Recessed Converter Kit With Mallot 13 Wide Ceiling Light 90w92 Lamps Plus

Convert Recessed Light To Chandelier Thecanconverter

Westinghouse Recessed Light Converter

Bazz 6 In Wi Fi Rgb Led Tunable New Construction Remodel Recessed Conversion Kit Con6rgbtnwwf The Home Depot

Model R56 5 6 Inch Can Conversion With Designer Flat Medallion
Related Posts


