How to Install a Ceiling Rose Light Fitting
Installing a ceiling rose light fitting is a relatively simple task that can be completed in a few hours. However, it is important to follow the instructions carefully to ensure that the fitting is installed safely and correctly.
Tools and Materials
Before you begin, you will need to gather the following tools and materials:
- Ceiling rose light fitting
- Screwdriver
- Wire cutters
- Wire strippers
- Electrical tape
- Step ladder
Step-by-Step Instructions
- Turn off the electricity at the fuse box or circuit breaker. This is essential for safety, as you will be working with live wires.
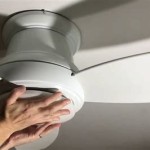
- Remove the old light fitting. If there is an existing light fitting, use a screwdriver to remove the screws holding it in place. Carefully disconnect the wires from the fitting and pull it away from the ceiling.
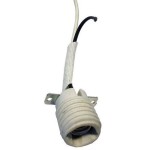
- Prepare the wires. Use a wire stripper to remove about 1 inch of insulation from the ends of the wires. Twist the exposed wires together and wrap them with electrical tape.
- Connect the wires. Connect the black (live) wire from the ceiling to the black wire from the light fitting. Connect the brown (neutral) wire from the ceiling to the brown wire from the light fitting. Connect the green/yellow (earth) wire from the ceiling to the green/yellow wire from the light fitting.
- Secure the wires. Use electrical tape to secure the wires together and make sure that they are not touching each other.
- Mount the ceiling rose. Place the ceiling rose over the wires and secure it with the screws provided.
- Install the light fitting. Push the light fitting into the ceiling rose until it clicks into place.
Safety First
It is important to remember that electricity can be dangerous. If you are not confident in your ability to install a ceiling rose light fitting, it is best to hire a qualified electrician.
Here are some safety tips to keep in mind:
- Always turn off the electricity before working on any electrical fittings.
- Make sure that the wires are properly insulated and connected.
- Do not overload the light fitting.
- If you are unsure about anything, consult an electrician.
Conclusion
Installing a ceiling rose light fitting is a straightforward task that can be completed in a few hours. By following the instructions carefully and taking the necessary safety precautions, you can ensure that the fitting is installed safely and correctly.

How To Swap An Old Ceiling Rose With A Modern Light Fixture Plumbing Electric Wonderhowto

How To Install Our Ceiling Roses Authentic Additions

Inside The Circuit Pendant Lighting Light Switch Wiring Homeowner Faqs

Extending A Lighting Circuit Step By Guide And

Extending A Lighting Circuit Step By Guide And

How To Install Our Ceiling Roses Authentic Additions

Changing Ceiling Rose To Class 2 Led Light Fitting R Electricians

How To Install Ceiling Roses An Easy Follow Guide

What Is A Ceiling Rose Blog

Ceiling Rose Wiring Diagrams Harmonised Colours Light Fitting
Related Posts