Replacing a Dome Light with a Ceiling Fan: A Step-by-Step Guide
Upgrading the lighting in your home can significantly improve its ambiance and functionality. Replacing a dome light with a ceiling fan is a relatively simple task that can offer both practical and aesthetic benefits. Here's a comprehensive guide to help you navigate the process.
Safety First
Before you begin, ensure your safety by turning off the breaker that powers the dome light. Test the current by flicking the light switch before proceeding.
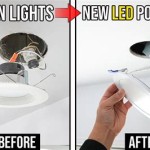
Remove the Dome Light
Gently pry off the dome light cover by inserting a flat-head screwdriver or a butter knife into the seam. Once the cover is removed, unscrew the mounting screws and carefully disconnect the wires from the light fixture. Be mindful of the live wires and handle them with caution.
Install the Ceiling Fan Mount
Determine the location of the ceiling joists using a stud finder. Mark the center of the joist where you want to mount the ceiling fan. Follow the manufacturer's instructions to install the ceiling fan mount securely.
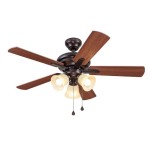
Assemble the Ceiling Fan
According to the manufacturer's instructions, assemble the ceiling fan. This typically involves attaching the fan blades, motor housing, and canopy to the mounting bracket. Be sure to tighten all screws and bolts securely.
Connect the Wires
Ensure the wires from the ceiling fan are long enough to reach the electrical box. If not, carefully extend the wires using wire nuts. Connect the wires according to their colors: black to black, white to white, and green or bare copper to the ground wire.
Mount the Ceiling Fan
Carefully lift the assembled ceiling fan into place and align it with the mounting bracket. Secure it using the provided mounting screws and washers. Tighten them firmly to prevent any wobbling or movement.
Restore Power and Test
Turn on the breaker to restore power to the ceiling fan. Check if the fan is functioning correctly by turning it on and adjusting the speed and direction.
Clean Up
Remove any debris or excess wires from the installation process. Replace the ceiling fan cover and screws to complete the installation.
Additional Tips
- If you're not comfortable working with electrical components, it's recommended to hire a qualified electrician.
- Use a ladder step stool or a scaffolding platform for safety and stability.
- Consult the manufacturer's instructions carefully to ensure proper installation and safety guidelines.
- Choose a ceiling fan with an appropriate size and light output for your room.

4 Ways To Replace A Light Bulb In Ceiling Fan Wikihow

Replacing A Ceiling Fan Light With Regular Fixture Jlc

21 Light Alternatives To Upgrade Your Home

4 Ways To Replace A Light Bulb In Ceiling Fan Wikihow

How To Change The Light Bulb On This Ceiling Fan R Howto

How To Wire A Ceiling Fan With Light 5 Diy Methods

How To Replace A Light Fixture With Ceiling Fan Projects By Peter

How To Choose A Light Bulb For Your Ceiling Fan

How To Change The Light Bulb On This Ceiling Fan R Howto

Hampton Bay Averly 52 In Integrated Led Brushed Nickel Ceiling Fan With Light And Remote Control Color Changing Technology Ak18b Bn The Home Depot
Related Posts