Wiring a Ceiling Fan with Two Light Switches: A Comprehensive Guide
Adding a ceiling fan to your home can provide both cooling and style, but the wiring can seem daunting if you're not an electrician. Don't despair! With careful planning and a few simple steps, you can successfully wire a ceiling fan with two light switches.
Tools and Materials You'll Need:
- Ceiling fan
- Electrical wiring (14-gauge or 12-gauge)
- Electrical tape
- Wire nuts
- Light switch
- Wire connectors
- Screwdriver
- Voltage tester
- Electrical box
- Ceiling fan canopy kit
- Junction box
Step-by-Step Instructions:
1. Safety First:Before starting any electrical work, always turn off the power at the circuit breaker or fuse box.
2. Prepare the Electrical Box:Install an electrical box in the ceiling where you want to mount the ceiling fan. Follow the manufacturer's instructions to ensure it is securely fastened.
3. Install the Ceiling Fan Canopy Kit:Attach the canopy kit to the ceiling fan and secure it using the provided screws.
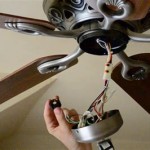
4. Connect Electrical Wires:Run the electrical wires from the electrical box to the junction box and ceiling fan canopy. Connect the black wires together, the white wires together, and the ground wires (usually green or bare copper) together. Use wire nuts and electrical tape to insulate the connections.
5. Wire the Light Switches:Connect the black wire from the junction box to the brass terminal on the light switch. Connect the white wire from the junction box to the silver terminal. Connect the ground wire to the green terminal.
6. Install the Junction Box:Secure the junction box above the electrical box using screws.
7. Connect the Ceiling Fan:Hang the ceiling fan on the hook provided in the canopy kit. Connect the fan wires to the wires from the junction box according to the fan manufacturer's instructions. Usually, black connects to black, white connects to white, and green connects to green.
8. Test the Connections:Turn the power back on and use a voltage tester to ensure the connections are working properly. The light switch should control the lights on the ceiling fan, and the other switch should control the fan motor.
Additional Tips:
- Use wire connectors to ensure secure electrical connections.
- Double-check all connections before turning the power back on.
- Consult an electrician if you have any doubts or the fan doesn't work properly after wiring.
Conclusion:
Wiring a ceiling fan with two light switches is a manageable task that can enhance both the comfort and aesthetics of your home. By following these detailed instructions, you can ensure a safe and successful installation. Enjoy the benefits of a well-ventilated and stylish living space!

How To Install A Ceiling Fan Two Wall Switches What Bb Built

Ceiling Fan Wiring Diagram Two Switches

Need Feedback On Wiring Fan And Switch With Smartswitches Projects Stories Smartthings Community

Help Needed On Going From Fan W Light With Two Switches To And Separate Lights Same R Askanelectrician

How Should I Connect The Wiring For Fans And Lights To Separate Control Switches Quora

Ceiling Fan Switch Wiring Electrical 101

Wiring A Ceiling Fan And Light With Diagrams Ptr

How To Wire A Ceiling Fan Control Using Dimmer Switch

How To Connect Wiring For Ceiling Fan With Remote Receiver Connection Two Switches Manual Only Shows Method Single Switch R Askanelectrician

How To Wire A Ceiling Fan Control Using Dimmer Switch
Related Posts