Installing a Ceiling Fan Light: A Comprehensive Guide
Installing a ceiling fan light can enhance the ventilation, aesthetics, and ambiance of your living spaces. Whether you're an experienced DIYer or a first-timer, this guide will provide you with step-by-step instructions to ensure a safe and successful installation.
Before You Start
1. Gather the necessary tools: a screwdriver, wire cutter/stripper, electrical tape, ladder, and safety glasses. 2. Make sure you have sufficient clearance above and below the fan for proper operation. 3. Turn off the power at the electrical panel before starting any work.
Mounting the Ceiling Fan
1. Locate the ceiling joists and mark their positions using a stud finder. 2. Install the ceiling fan mount securely to the joists using the provided screws. 3. Attach the downrod to the ceiling fan mount. 4. Lift the ceiling fan onto the downrod and secure it with the locknut.
Wiring the Ceiling Fan
1. Identify the electrical wires: black (hot), white (neutral), and bare copper or green (ground). 2. Connect the black wire from the fan to the black wire from the ceiling. 3. Connect the white wire from the fan to the white wire from the ceiling. 4. Wrap the ground wire from the fan around the ground wire from the ceiling and secure it with a wire nut. 5. Tuck the wires neatly into the electrical box.
Installing the Light Fixture
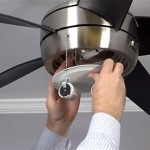
1. Assemble the light fixture according to the manufacturer's instructions. 2. Connect the black wire from the light fixture to the black wire from the ceiling. 3. Connect the white wire from the light fixture to the white wire from the ceiling. 4. Attach the light fixture to the ceiling fan using the provided screws.
Finishing Up
1. Install the fan blades onto the blade brackets. 2. Inspect all connections for tightness and proper wiring. 3. Turn on the power at the electrical panel and test the operation of the fan and light. 4. Balance the fan blades if necessary to prevent wobbling.
Tips for Success
1. Use a ceiling fan-rated electrical box to support the weight of the fan and light fixture. 2. Ensure that the ceiling fan is properly grounded to prevent electrical hazards. 3. If you encounter any difficulties or are not comfortable performing electrical work, consult a licensed electrician.
Conclusion
With careful planning and attention to detail, you can successfully install a ceiling fan light yourself. It's a rewarding project that can upgrade the functionality and style of your home. By following these instructions and adhering to electrical safety regulations, you can enjoy a well-ventilated, well-lit, and visually appealing living space.

Wiring A Ceiling Fan And Light With Diagrams Ptr

Wiring A Ceiling Fan And Light With Diagrams Ptr

4 Ways To Replace A Light Bulb In Ceiling Fan Wikihow

Wiring A Ceiling Fan And Light With Diagrams Ptr

Wiring A Ceiling Fan And Light With Diagrams Ptr

Wiring A Ceiling Fan And Light With Diagrams Ptr

Wiring A Ceiling Fan And Light With Diagrams Ptr

I Recently Installed A Ceiling Fan With Light Where There Was Formerly Just It Works Great But The Switch On Wall Doesn T Turn Off Why

How To Wire A Ceiling Fan Control Using Dimmer Switch

4 Ways To Replace A Light Bulb In Ceiling Fan Wikihow
Related Posts