Hampton Bay Ceiling Fan Switch Replacement: A Comprehensive Guide
Ceiling fans, often adorned with lighting fixtures, provide both airflow and illumination in our living spaces. Hampton Bay ceiling fans are known for their reliability and aesthetic appeal. However, like any electrical appliance, they may occasionally require repairs, including switch replacements. This guide will provide you with step-by-step instructions on how to replace a Hampton Bay ceiling fan switch, ensuring both safety and functionality.
Safety Precautions
Before embarking on any electrical work, it is crucial to prioritize safety. Turn off the power supply to the fan at the circuit breaker panel. This will prevent any electrical shocks or injuries during the repair process. Additionally, ensure that the fan blades have completely stopped moving before proceeding.
Preparing for Switch Replacement
Gather the necessary tools, including a Phillips head screwdriver, wire strippers, and electrical tape. Locate the switch housing on the fan canopy, which is usually held in place by screws. Carefully remove the screws and detach the housing from the canopy.
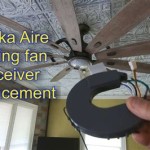
Disconnecting the Old Switch
Inside the switch housing, you will find the old switch connected to wires. Disconnect the wires from the switch terminals by loosening the screws that hold them in place. Note the wire positions to ensure proper reconnection during the installation of the new switch.
Installing the New Switch
Align the new switch correctly in the housing and tighten the screws that hold it in place. Connect the wires to the corresponding terminals on the new switch. Ensure that the wire connections are secure and insulated using electrical tape to prevent short circuits.
Reattaching the Switch Housing
Carefully insert the switch housing back into the canopy and secure it using the screws you removed earlier. Ensure that the switch housing is properly aligned and fits snugly. Double-check all wire connections for tightness and insulation.
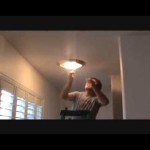
Restoring Power and Testing
Return to the circuit breaker panel and restore power to the fan. Turn on the fan and verify that the new switch is functioning correctly. Test both the fan and light functions to ensure that they operate smoothly.
Troubleshooting Tips
If you encounter any issues after replacing the switch, here are a few troubleshooting tips:
- Check the wire connections to ensure they are secure and not loose.
- Inspect the switch for any visible damage or defects.
- If the fan or light does not turn on, the problem may lie elsewhere in the circuit.
Conclusion
Replacing a Hampton Bay ceiling fan switch is a relatively straightforward task that can be completed with proper safety precautions and following the steps outlined in this guide. By addressing switch malfunctions promptly, you can ensure the continued comfort and functionality of your ceiling fan, enjoying its cooling breeze and ambient lighting for years to come.

Hampton Bay Ceiling Fan Wall Switch 9050h The Home Depot

Hampton Bay Ceiling Fan Replacement Switch Cap Cover Tarnished Broe 3 8

Hampton Bay Ceiling Fan Wall Switch 9050h The Home Depot

Hampton Bay Raleigh 111 Ceiling Fan Replacement Switch Cup Light Kit White

Hampton Bay Ceiling Fan Replacement Switch Cap Cover Oiled Broe 3 7 8

How To Replace The Switch On A Hampton Bay Ceiling Fan Ehow

Ceiling Fan Remote Control Replacement For Hampton Bay Hunter Uc7078t Chq7078t Chq8bt7078t L3h2003fanhd Hd Hd6 Rr7078tr With Reverse Com

Hampton Bay Universal Ceiling Fan Wireless Wall Switch 68109 The Home Depot

Ceiling Fan Switch Zing Ear Ze 208s E89885 3 Sd 4 Wire Pull Chain Light Replacement Part With Pre Installed Wires Nickel Yahoo Ping

Hqrp Ceiling Fan 3 Sd 4 Wire Control Switch For Hampton Bay Com
Related Posts