Essential Aspects of Changing a Ceiling Light Box
Replacing a ceiling light box may seem daunting initially, but it's a relatively straightforward task that can be accomplished with the right tools and a bit of know-how. Here are the steps involved to guide you through the process:
1. Safety First
Before embarking on any electrical work, always ensure to turn off the power at the main circuit breaker panel to prevent any electrical hazards.
2. Removing the Old Light Box
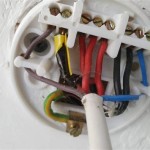
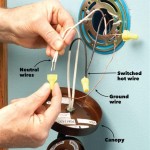
Using a screwdriver, unscrew the mounting screws that hold the old light box in place. Carefully pull the light box out of the ceiling, disconnecting the wires by unhooking them from the old box.
3. Preparing the Wires
Once the wires are detached from the old box, strip about half an inch of insulation from the ends of each wire. This exposes the bare copper wires, which will be connected to the new light box.
4. Installing the New Light Box
Position the new light box in the ceiling and secure it with the mounting screws. Connect the wires to the new box by twisting the bare copper wires together and wrapping them with electrical tape to ensure a secure connection.
5. Grounding the Light Box
Most light boxes have a ground wire that needs to be connected to a ground screw or grounded wire in the ceiling. Twist the ground wire around the ground screw and tighten it to establish a proper ground.
6. Attaching the Fixture
Once the light box is securely installed and grounded, you can attach the light fixture. Align the fixture with the mounting bracket on the light box and fasten it with the screws provided.
7. Restoring Power
With the fixture fastened, return to the circuit breaker panel and restore power to the ceiling light circuit. Test the light fixture to ensure it's working correctly.
Tips for Success
- Use the correct size screwdriver to avoid stripping the screws.
- Make sure the wires are firmly connected and insulated with electrical tape to prevent electrical fires.
- If you're unsure about any step, consult a qualified electrician for guidance.
- If the ceiling is high or difficult to reach, consider using a step ladder or scaffolding for safety.
- Dispose of the old light box and any electrical components responsibly at a designated recycling facility.
Conclusion
Changing a ceiling light box is a manageable task that requires attention to detail and adherence to safety measures. By following these steps carefully, you can successfully update your lighting system and enhance the ambiance of your space.

Mounting Light Fixtures Fine Homebuilding

How To Install A Ceiling Light Fixture Diy Family Handyman

How To Replace An Old Fluorescent Light Fixture Young House Love

How To Replace A Light Fixture With Ceiling Fan Projects By Peter

How To Install A Ceiling Light Fixture Diy Family Handyman

How To Replace An Old Fluorescent Light Fixture Young House Love

How To Replace An Old Fluorescent Light Fixture Young House Love

How To Install Ceiling Light Fixtures Ehow

How To Install A Pendant Light Simple Step By Guide
Replacing A Ceiling Fan Light With Regular Fixture Jlc
Related Posts


