Wiring a Ceiling Fan and Light: A Comprehensive Guide
Installing and wiring a ceiling fan and light can enhance both the aesthetics and functionality of your room. While it may seem daunting, the process can be broken down into manageable steps. In this article, we will guide you through the essential aspects of wiring a ceiling fan and light, ensuring a safe and successful installation.
1. Safety Precautions
Before starting, ensure your safety by turning off the power at the circuit breaker panel. Wear safety glasses and gloves throughout the process. It is also advisable to work with a qualified electrician if you lack experience in electrical work.
2. Gather Tools and Materials
You will need the following tools and materials:
- Ceiling fan and light fixture
- Electrical wire (14-gauge or 12-gauge, depending on the fan's requirements)
- Wire strippers
- Screwdriver
- Electrical tape
- Ceiling fan mounting bracket
- Junction box
3. Install the Ceiling Fan Mounting Bracket
Locate the ceiling joists and install the ceiling fan mounting bracket securely using screws. Ensure that the bracket is level and centered.
4. Install the Electrical Box
The electrical box will house the electrical connections. Attach the box to the ceiling joists near the mounting bracket.
5. Run the Electrical Wires
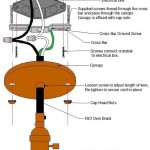
From the junction box, run the electrical wires to the ceiling fan and light fixture. Use wire strippers to remove about half an inch of insulation from the ends of the wires. Connect the wires to the corresponding terminals on the fan and light fixture using wire nuts. Wrap electrical tape around the connections for added insulation.
Ensure that the white wires are connected to the white wires, the black wires to the black wires, and the green or bare copper wires to the ground wire.
6. Mount the Ceiling Fan
Carefully lift the ceiling fan and mount it onto the mounting bracket. Secure it with screws.
7. Test the Installation
Turn the power back on at the circuit breaker panel. Test the fan and light to ensure they are working properly. Adjust the speed and direction of the fan as desired.
8. Tips for a Successful Installation
- Use the correct size wire for the fan's requirements.
- Make sure all electrical connections are tight and secure.
- Test the fan and light before finalizing the installation.
- If you encounter any difficulties, consult a qualified electrician.
Wiring a ceiling fan and light can be a rewarding project that enhances the comfort and aesthetics of your room. By following these steps carefully and adhering to safety precautions, you can enjoy the benefits of a fully functional ceiling fan and light for years to come.

Wiring A Ceiling Fan And Light With Diagrams Ptr

Wiring A Ceiling Fan And Light With Diagrams Ptr

Wiring A Ceiling Fan And Light With Diagrams Ptr

How To Wire A Ceiling Fan Temecula Handyman

Wiring A Ceiling Fan And Light With Diagrams Ptr

Wiring A Ceiling Fan And Light With Diagrams Ptr

Wiring A Ceiling Fan And Light With Diagrams Ptr

Replacing A Ceiling Fan Light With Regular Fixture Jlc

How To Wire A Ceiling Fan Temecula Handyman

Ceiling Fans Wiring And Installation Pocket Sparky
Related Posts