How to Install a Ceiling Fan with Remote
Ceiling fans can provide both comfort and style to any room in your home. They can help to circulate the air, keeping you cool in the summer and warm in the winter. And with the addition of a remote control, you can easily adjust the fan's speed and direction without having to get up from your seat.
If you're looking to install a ceiling fan with remote, here's a step-by-step guide to help you get started:
1. Safety First
Before you begin, it's important to take some safety precautions. Make sure to turn off the power to the room where you'll be installing the fan. You can do this by flipping the circuit breaker or removing the fuse. Also, be sure to wear safety glasses and gloves to protect yourself from any debris.
2. Gather Your Tools and Materials
Once you have taken care of the safety precautions, you will need to gather the following tools and materials:
- Ceiling fan with remote
- Screwdriver
- Drill
- Wrench
- Wire cutters
- Electrical tape
- Mounting bracket
- Ceiling box
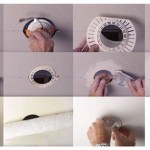
3. Mount the Ceiling Box
The first step is to mount the ceiling box to the ceiling joists. The ceiling box is the electrical box that will support the weight of the fan. To mount the ceiling box, follow these steps:
- Locate the ceiling joists using a stud finder.
- Drill two pilot holes into the joists.
- Insert the screws into the pilot holes and tighten them until the ceiling box is securely mounted.
4. Install the Mounting Bracket
Next, you will need to install the mounting bracket to the ceiling box. The mounting bracket is the bracket that will hold the fan in place. To install the mounting bracket, follow these steps:
- Attach the mounting bracket to the ceiling box using the screws that came with the fan.
- Tighten the screws until the mounting bracket is securely in place.
5. Wire the Fan
Now it's time to wire the fan. To do this, follow these steps:
- Connect the black wire from the fan to the black wire from the ceiling box.
- Connect the white wire from the fan to the white wire from the ceiling box.
- Connect the green wire from the fan to the ground wire from the ceiling box.
- Wrap the wire connectors with electrical tape to secure the connections.
6. Hang the Fan
Once the fan is wired, you can hang it from the mounting bracket. To do this, follow these steps:
- Lift the fan up to the mounting bracket.
- Align the holes in the fan with the holes in the mounting bracket.
- Insert the screws into the holes and tighten them until the fan is securely in place.
7. Install the Remote Control
The final step is to install the remote control. To do this, follow these steps:
- Insert the batteries into the remote control.
- Program the remote control to the fan.
- Mount the remote control to the wall or ceiling using the screws that came with the remote.
Conclusion
Installing a ceiling fan with remote is a relatively easy project that can be completed in a few hours. By following these steps, you can enjoy the comfort and convenience of a ceiling fan in your home.

How To Wire A Ceiling Fan Control Using Dimmer Switch

I Am Installing A Remote To Ceiling Fan Where Does The Red Wire Go Quora

Wiring For A Ceiling Fan With Dimmer Switch And Remote Doityourself Com Community Forums

Ceiling Fan Remote With 2 Wires Doityourself Com Community Forums

Ceiling Fan Wiring Diagram

How To Wire A Ceiling Fan Control Using Dimmer Switch

How To Wire A Ceiling Fan Control Using Dimmer Switch

How To Wire A Ceiling Fan Control Using Dimmer Switch

How To Wire A Ceiling Fan Control Using Dimmer Switch

How To Install A Ceiling Fan Two Wall Switches What Bb Built