Installing Recessed Lighting in Drywall Ceiling: A Comprehensive Guide
Recessed lighting fixtures are a versatile and energy-efficient way to illuminate any room in your home. They are ideal for creating a soft, ambient glow and can be used to accentuate architectural features or artwork. Installing recessed lighting in a drywall ceiling is a relatively straightforward project that can be completed in a few hours with the proper tools and materials.
Tools and Materials Needed:
- Recessed lighting fixtures
- Rough-in housing
- Junction box
- Romex wire
- Wire connectors
- Drill
- Saw
- Hammer
- Level
- Tape measure
- Pencil
- Safety glasses
Step 1: Plan the Lighting Layout:
Before you start installing the recessed lighting, you need to plan the layout of the fixtures. Decide where you want the lights to be placed and how many fixtures you will need. Make sure to consider the size of the room and the amount of light you want to achieve. You can use a tape measure and pencil to mark the locations of the fixtures on the ceiling.
Step 2: Cut the Holes for the Fixtures:
Once you have planned the layout of the fixtures, you can start cutting the holes for them. Use a saw to cut a hole in the drywall at each marked location. Make sure the holes are slightly larger than the diameter of the rough-in housing. You can use a hammer and pry bar to remove the cut drywall.
Step 3: Install the Rough-in Housing:
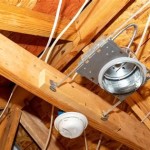
The rough-in housing is the support structure for the recessed lighting fixtures. Insert the rough-in housing into each of the holes you cut in the drywall. Make sure the housing is flush with the ceiling and secure it in place with screws.
Step 4: Connect the Wiring:
Next, you need to connect the wiring for the recessed lighting fixtures. Run the Romex wire from the junction box to each of the rough-in housings. Cut the wire to the appropriate length and strip the ends. Connect the wires to the terminals on the fixture using wire connectors. Make sure to connect the black wire to the black terminal, the white wire to the white terminal, and the ground wire to the green terminal.
Step 5: Install the Recessed Lighting Fixtures:
Once the wiring is complete, you can install the recessed lighting fixtures. Insert each fixture into the rough-in housing and secure it in place with the provided screws. Make sure the fixture is level and flush with the ceiling.
Step 6: Test the Fixtures:
Before you finish the installation, test the recessed lighting fixtures to make sure they are working properly. Turn on the lights and check to see if they are all functioning correctly. If any of the fixtures are not working, check the wiring connections to make sure they are secure.

How To Put Recessed Lights In The Ceiling

8 Recessed Lighting Installation Tips For Diyers Bob Vila

8 Recessed Lighting Installation Tips For Diyers Bob Vila

How To Install Recessed Lighting The Home Depot

8 Recessed Lighting Installation Tips For Diyers Bob Vila

How To Install Recessed Lighting Like A Pro Our Home Made Easy

Installing Recessed Lighting Fine Homebuilding

How To Install Recessed Lighting Fixthisbuildthat

Install Recessed Lighting

Ultimate Guide How To Install Recessed Lighting
Related Posts
