The Lowdown on Hunter Ceiling Fan Light Connectors: A Comprehensive Guide
Hunter ceiling fans are renowned for their superior craftsmanship and stylish designs. To ensure optimal performance and lighting, these fans often come equipped with light connectors. These connectors play a crucial role in establishing a secure electrical connection between the fan's light kit and its power source.
In this comprehensive guide, we'll delve into the essential aspects of Hunter ceiling fan light connectors, empowering you with the knowledge and understanding necessary to make informed decisions when selecting and installing these components:
Types of Hunter Ceiling Fan Light Connectors
Hunter offers a range of light connectors designed to cater to specific fan models and lighting configurations. Here's a brief overview of the most common types:
- Screw-type connectors: These connectors feature a screw mechanism that securely holds the wires in place. They are commonly used in older Hunter fan models.
- Push-in connectors: As the name suggests, these connectors allow you to simply push the wires into designated slots, simplifying the installation process.
- Quick-connect connectors: These connectors feature pre-installed connectors that enable a fast and effortless connection.
Installation Considerations
When installing a Hunter ceiling fan light connector, it's crucial to follow the manufacturer's instructions precisely. Here are some key considerations to keep in mind:
- Check compatibility: Ensure that the connector you select is compatible with your specific fan model and light kit.
- Safety first: Always turn off the power at the circuit breaker before starting any electrical work.
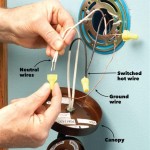
- Proper wiring: Connect the wires according to the designated color codes (black to black, white to white, green or bare copper to ground).
- Secure connections: Ensure that all connections are tight and secure to prevent any electrical hazards.
Troubleshooting Common Issues
While Hunter ceiling fan light connectors are generally reliable, certain issues can occasionally arise:
- Dim or flickering lights: This could indicate a loose connection. Check and tighten all connections.
- Lights not turning on: Verify that the power is on and that the connections are secure. Consider replacing the light bulbs.
- Overheating: If the connector feels excessively hot, disconnect it immediately and contact a qualified electrician.
Conclusion
Hunter ceiling fan light connectors are essential components that ensure the safe and efficient operation of your fan's lighting system. By understanding the different types, installation considerations, and troubleshooting common issues, you can confidently select and install the appropriate connector for your needs, enhancing the functionality and ambiance of your living space.

Hunter Ceiling Fan Control Wire Harness Repairs Start Sd Capacitors Reverse Switches 240 V Genuine Parts

Hunter 52 Ceiling Fan Replacement Light Kit Switch Cup White 3 Bulb

I Have The Typical Hunter Ceiling Fan Issue Where Lights Blink Because Of A Faulty Wattage Limiter Model Is

Hunter Port Isabel 52 In Indoor Outdoor Weathered Copper Ceiling Fan With Light Kit 51528 The Home Depot

Hunter Ceiling Fan Light Kit 3 Bulbs Adapter With Three Glass Shades

Hunter Hartland 52 In Led Indoor Noble Broe Ceiling Fan With Light Kit 50311 The Home Depot

Hunter Fans How To Install Your Ceiling Fan Cpo S

Hunter Fan Light Installation Wiring Discussion Inovelli Community

Hunterexpress Easy Installation Ceiling Fan Hunter

Installation Instructions For Hunter Ceiling Fan
Related Posts

