Installing a Ceiling Fan with Two Wall Switches: A Comprehensive Guide
Installing a ceiling fan with two wall switches may seem daunting, but by following a step-by-step process, you can ensure a safe and functional installation. This guide will provide you with detailed instructions to complete this task successfully.
Tools and Materials Required:
- Ceiling fan
- Two wall switches
- Electrical wire (14-gauge or thicker)
- Wire connectors
- Screwdriver
- Electrical tape
- Ladder
- Safety glasses
Step 1: Safety Precautions
- Turn off the power to the circuit at the main electrical panel.
- Wear safety glasses to protect your eyes from debris.
- Use a ladder to access the ceiling and work area safely.
Step 2: Preparing the Wiring
- Run the electrical wires from the ceiling junction box to the two wall switches.
- Use wire connectors to secure the wires and create the following connections:
- Connect the black wire (hot) from the ceiling to the black wire on both switches.
- Connect the white wire (neutral) from the ceiling to the white wire on one of the switches (designated as the main switch).
- Connect the blue wire (fan speed control) from the ceiling to the blue wire on the other switch (designated as the speed control switch).
- Connect the green wire (ground) from the ceiling to the green or bare copper ground wire on both switches.
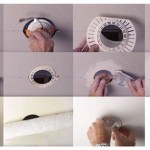
Step 3: Mounting the Ceiling Fan
- Assemble the ceiling fan according to the manufacturer's instructions.
- Mount the ceiling fan canopy onto the ceiling junction box.
- Secure the fan to the canopy using the provided screws.
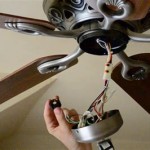
Step 4: Connecting the Wiring to the Ceiling Fan
- Feed the wires from the ceiling through the canopy and connect them to the fan's wire leads:
- Black wire to black wire
- White wire to white wire
- Blue wire to blue wire
- Green wire to green wire
- Secure the wire connections with wire connectors and electrical tape.
Step 5: Installing the Switches
- Turn on the power to the circuit at the main electrical panel.
- Install the wall switches in their respective electrical boxes.
- Ensure that the wires are properly connected to the terminals on the switches.
- Secure the switches in place with screws.
Step 6: Testing the Installation
- Turn on the main switch. The ceiling fan should start operating.
- Turn on the speed control switch to adjust the fan speed.
- Check if the fan responds smoothly to speed changes and operates quietly.
Congratulations! You have successfully installed a ceiling fan with two wall switches. Enjoy the improved airflow and comfort in your home.

How To Install A Ceiling Fan Two Wall Switches What Bb Built

Ceiling Fan Wiring Diagram Two Switches

How To Connect Wiring For Ceiling Fan With Remote Receiver Connection Two Switches Manual Only Shows Method Single Switch R Askanelectrician

Ceiling Fan Switch Wiring Electrical 101

How To Wire A Ceiling Fan Control Using Dimmer Switch

Ceiling Fan Switch Wiring Electrical 101

How To Install A Ceiling Fan Two Wall Switches What Bb Built

Wiring A Ceiling Fan Light Part 2

How To Wire Double Switch 2 Gang 1 Way Iec Nec

Wiring A Ceiling Fan Light Part 2