Essential Aspects of Installing A Hunter Ceiling Fan Remote Control
Hunter ceiling fans are renowned for their superior quality and innovative features, and the remote control is a convenient addition that enhances the user experience. Installing a Hunter ceiling fan remote control is a straightforward process that can be completed with basic tools and a bit of technical knowledge. However, it is crucial to follow specific guidelines to ensure safety and proper functionality.
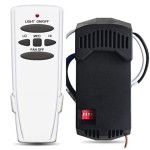
Before embarking on the installation, it is essential to have a clear understanding of the various components involved and their respective functions. A typical Hunter ceiling fan remote control system consists of a receiver module, a remote control unit, and a set of batteries. The receiver module is installed on the ceiling fan motor housing and receives signals from the remote control unit, which is used to operate the fan.
The installation process begins with disconnecting the power supply to the ceiling fan. This can be done by turning off the circuit breaker or removing the fuse that powers the fan. Once the power is disconnected, proceed with the following steps:
- Locate the receiver module included in the remote control kit. It typically resembles a small, rectangular box with multiple wires emanating from it.
- Identify the wire harness on the ceiling fan motor housing. This harness usually consists of several colored wires that connect to the fan's motor and capacitor.
- Connect the wires from the receiver module to the corresponding wires on the wire harness. The colors of the wires should match to ensure proper connections.
- Secure the receiver module firmly onto the ceiling fan motor housing using the provided screws or mounting brackets.
- Reconnect the power supply to the ceiling fan and test the remote control functions. Ensure that all fan speeds, light settings, and other features are operating as intended.
In some instances, the Hunter ceiling fan may not come with a pre-installed receiver module. In such cases, it is necessary to purchase a separate receiver module that is compatible with the fan model. The installation process for an aftermarket receiver module is similar to the one described above, but it may require additional wiring modifications.
It is essential to follow the installation instructions provided with the Hunter ceiling fan remote control kit carefully to avoid any potential hazards or damage to the fan. If you encounter any difficulties during the installation process, it is advisable to consult a qualified electrician for assistance.
Once the installation is complete, you can enjoy the convenience of operating your Hunter ceiling fan remotely. The remote control allows you to adjust fan speeds, dim or brighten the lights, and activate other features without having to reach for the fan's pull chains or wall switch.

How Do I Install New Hunter Ceiling Fan With Remote Control And Still Have Switch Wall For The Light Separately R Homemaintenance

How To Install A Hunter Ceiling Fan With Remote Know The Right Way

Universal Fan Light Wall Control With Receiver 99771 Hunter

How To Wire A Ceiling Fan Control Using Dimmer Switch

Universal Fan Light Remote Control With Receiver 99770 Hunter

Converting An Existing Ceiling Fan To A Remote Control

How To Install A Ceiling Fan With Remote Control Electrical

How To Wire A Ceiling Fan Control Using Dimmer Switch
3 Way Wiring Ceiling Fan With Remote For Two Wire Diy Home Improvement Forum
Related Posts


