How to Install a Hunter Ceiling Fan With Remote Control: A Step-by-Step Guide
Installing a Hunter ceiling fan with remote control can enhance the functionality and style of any room. To ensure a successful installation, follow these comprehensive instructions carefully.
Step 1: Gather Materials and Tools
- Hunter ceiling fan with remote control
- Screwdriver
- Electrician's tape
- Wire nuts
- Safety glasses
- Ladder
- Ceiling fan canopy
- Downrod
- Mounting bracket
- Ceiling hook
Step 2: Prepare the Electrical Circuit
Turn off the power to the circuit at the breaker panel. Remove the existing light fixture or ceiling fan if present.
Step 3: Install the Mounting Bracket
Attach the mounting bracket to the ceiling joist using the screws provided. Ensure the bracket is centered and secure.
Step 4: Hang the Ceiling Hook
Loop the ceiling hook onto the mounting bracket and secure it with the provided bolt. The hook should be strong enough to support the weight of the fan.
Step 5: Assemble the Fan
Slide the downrod onto the motor housing and secure it with screws. Attach the blades to the motor housing using the provided brackets and screws.
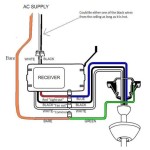
Step 6: Wire the Fan
Connect the black wire from the fan to the black wire from the ceiling, the white wire to the white wire, and the green wire to the ground wire. Use wire nuts to secure the connections and insulate them with electrical tape.
Step 7: Mount the Fan Canopy and Fan
Place the fan canopy over the mounting bracket and secure it with screws. Lift the fan assembly and hook it onto the ceiling hook. Secure the fan with the provided screws.
Step 8: Install the Remote Control Receiver
Locate the remote control receiver and connect the wires from the fan to the corresponding terminals on the receiver. Secure the receiver to the ceiling.
Step 9: Install the Remote Control Batteries
Insert the batteries into the remote control and test the fan's operation. Make any necessary adjustments to ensure smooth performance.
Step 10: Turn on the Power
Restore power to the circuit at the breaker panel. The fan should start working with the remote control.
Tips for a Successful Installation
- Read the instructions carefully before starting.
- Ensure a qualified electrician performs the wiring if you're not comfortable with electrical work.
- Use safety glasses while working.
- Double-check all connections for tightness.
- Balance the fan after installation to prevent wobbling.
By following these steps, you can successfully install a Hunter ceiling fan with remote control and enhance the functionality and comfort of your home.

How Do I Install New Hunter Ceiling Fan With Remote Control And Still Have Switch Wall For The Light Separately R Homemaintenance

How To Install A Hunter Ceiling Fan With Remote Know The Right Way

How To Install A Ceiling Fan With Remote Control Electrical

Converting An Existing Ceiling Fan To A Remote Control

On Off Handheld Remote With Receiver 99772 Hunter Fan

Universal Remote Control With Sd Light Receiver Hunter Fan

Universal Ceiling Fan Remote Control Kit 3 In 1 Light Timing Sd For Hunter Harbor Breeze Westinghouse Honeywell Other Lamp Com

Universal Remote Control With Sd Light Receiver Hunter Fan

Hunter 99770 Dove Grey Universal 3 Sd Remote Control With Receiver For Ceiling Fans And Light Kits Lightingdirect Com

Hunter Fan Remote Control 99390 Hunterfan Co
Related Posts