How To Install A Universal Ceiling Fan Remote Control
Ceiling fans are a great way to keep your home cool and comfortable, but they can be a pain to operate if you have to get up and down to turn them on and off. A ceiling fan remote control can make it much easier to control your fan, and it's a relatively easy project to install yourself.
Here's a step-by-step guide on how to install a universal ceiling fan remote control:
1. Turn off the power to the ceiling fan circuit
This is a very important safety precaution, so don't skip it! Turn off the power to the ceiling fan circuit at the breaker panel before you start working on the fan.
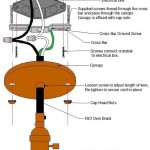
2. Remove the ceiling fan canopy
The canopy is the decorative cover that hides the ceiling fan's motor and wiring. It's usually held in place by a few screws. Remove the screws and carefully lift the canopy off the fan.
3. Identify the wires
Inside the canopy, you'll see a bunch of wires. They'll be connected to the fan's motor and the ceiling fan remote control receiver. The wires will be color-coded, so it's easy to identify which ones go where.
The typical wire colors are:
- Black: Line (hot)
- White: Neutral
- Green or Bare Copper: Ground
- Blue: Light
- Red: Fan
4. Connect the wires
Now it's time to connect the wires from the ceiling fan remote control receiver to the wires from the fan. Twist the ends of the wires together and secure them with a wire nut. Make sure the connections are tight, but don't overtighten them.
Here's how to connect the wires:
- Connect the black wire from the receiver to the black wire from the fan.
- Connect the white wire from the receiver to the white wire from the fan.
- Connect the green or bare copper wire from the receiver to the green or bare copper wire from the fan.
- Connect the blue wire from the receiver to the blue wire from the fan (if your fan has a light).
- Connect the red wire from the receiver to the red wire from the fan.
5. Reinstall the ceiling fan canopy
Once the wires are connected, carefully lift the canopy back onto the fan and secure it with the screws.
6. Turn on the power and test the remote control
Turn on the power to the ceiling fan circuit and test the remote control. The fan should turn on and off, and the light should dim or brighten when you press the buttons on the remote control.
If the remote control doesn't work, check the connections to make sure they're tight. You may also need to reprogram the remote control to the fan.
Congratulations! You've now successfully installed a universal ceiling fan remote control. Enjoy the convenience of being able to control your fan from anywhere in the room.

Universal Remote Ceiling Fan Light Installation Diagram Doityourself Com Community Forums

Ceiling Fan Remote Control Information Do You Need A

Universal Ceiling Fan Remote Control Kit 3 In 1 Light Timing Sd For Hunter Harbor Breeze Westinghouse Honeywell Other Lamp Batteries Are Not Included Temu

Hampton Bay Universal 3 Sd Damp Rated Ceiling Fan Remote Control With Dimming Black 98130 The Home Depot

Universal Fan Light Wall Control With Receiver By Hunter Hun 99771 Hun1112481

Ready Stock Universal Ceiling Fan Remote Control Board Easy To Install Home Office Use Lazada Ph

Universal Ceiling Fan Remote Control Hampton Bay Hunter Harbor Breeze Ge 340 887

Hunter Universal On Off Damp Rated Ceiling Fan Remote Control White 99394 The Home Depot

Ceiling Fan Remote Control Kit Small Size Universal Fans Light Sd Timing Wireless
Related Posts


