Installing a Ceiling Fan Without Existing Wiring
Adding a ceiling fan to a room without existing wiring can seem like a daunting task, but it's entirely possible with proper planning and execution. Here's a detailed guide to help you navigate this project:
Before You Begin
1. Safety First: Turn off your home's electricity supply at the main breaker panel before starting any work.
2. Gather Materials: You'll need a ceiling fan, electrical wiring (14 or 12 gauge NM-B wire), electrical tape, wire nuts, a drill, a hole saw (for making holes in the ceiling), a stud finder, a screwdriver, and a voltage tester.
Step 1: Find a Mounting Location
Locate the center of the room using a chalk line or laser level. Use a stud finder to locate the ceiling joists and mark their positions. Choose a mounting location for the fan that aligns with a joist for secure installation.
Step 2: Run the Wiring
Drill a hole through the ceiling at the mounting location. Feed the electrical wiring through the hole and into the attic. Run the wire to the nearest electrical junction box or switch box. If there isn't an existing junction box, you'll need to install one.
Strip the ends of the wiring and connect them to the appropriate terminals in the junction box. For example, black to black, white to white, and green or bare copper wire to ground.
Step 3: Install the Fan Mount
Locate the mounting plate that came with the ceiling fan. Position it on the ceiling at the mounting location and align it with the ceiling joist. Secure the mounting plate using screws.
Step 4: Install the Fan
Attach the fan assembly onto the mounting plate. Most fans use a ball-and-socket mechanism for easy installation. Push the fan up until it locks into place.
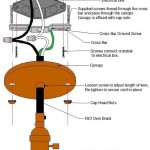
Feed the electrical wires through the top of the fan and connect them to the corresponding wires labeled on the fan's wiring diagram. Ensure the connections are tight and secure with wire nuts.
Step 5: Finish the Installation
Attach the fan blades and light fixture (if applicable). Turn on the power supply at the main breaker panel.
Test the Fan: Turn on the fan and check its operation. Use a voltage tester to ensure there's no exposed electricity.
Additional Tips
1. Hire a Professional: If you're not comfortable working with electricity, don't hesitate to hire a licensed electrician for assistance.
2. Use Proper Tools: Ensure you have the correct tools, such as a hole saw and voltage tester, to ensure a safe and efficient installation.
3. Check for Obstructions: Before drilling holes in the ceiling, use a stud finder to ensure there are no electrical wires or pipes in the way.
4. Follow Instructions: Carefully read the manufacturer's instructions that came with your ceiling fan. Each fan may have specific requirements for installation.
Congratulations! You've successfully installed a ceiling fan without existing wiring. Enjoy the added comfort and air circulation it brings to your room.

How To Install A Ceiling Fan Where No Fixture Exists 8 Step Guide Home Inspector Secrets

Installing A Ceiling Fan Without Existing Wiring Electricians Talklocal Blog Talk Local

Installing A Ceiling Fan Without Existing Wiring Mr Electric
How To Install A Ceiling Fan Without Having Cut Into The Electrical Box No Attic Access Quora

How To Install A Ceiling Fan Where No Fixture Exists 8 Step Guide Home Inspector Secrets

How To Install A Ceiling Fan Without Existing Wiring

How To Install A Ceiling Fan Without Existing Wiring 8 Steps

Replacing A Ceiling Fan Light With Regular Fixture Jlc

How To Install A Ceiling Fan Without Existing Wiring 8 Steps

How To Install A Ceiling Fan Without Existing Wiring Homes Valy
Related Posts


