Hampton Bay Hawkins 44 In Ceiling Fan Instructions: A Comprehensive Guide
Installing and operating a ceiling fan can enhance comfort and style in your home. The Hampton Bay Hawkins 44 In Ceiling Fan offers a blend of functionality and aesthetics, and following the provided instructions ensures a successful installation and optimal performance.
1. Safety Precautions
Before beginning the installation, ensure the following safety precautions are observed:
- Turn off the circuit breaker or fuse at the main electrical panel.
- Use appropriate safety gear, such as gloves and safety glasses.
- Verify that all components are accounted for and undamaged before proceeding.
2. Assembling the Fan
Carefully assemble the fan according to the instructions provided. Key steps include:
- Attach the downrod to the motor housing and secure it with screws.
- Connect the fan blades to the motor and tighten the screws using a screwdriver.
- Install the canopy over the mounting bracket and secure it with screws.
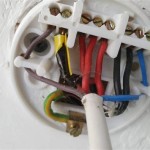
3. Electrical Wiring
Once the fan is assembled, proceed with the electrical wiring:
- Identify the wires from the ceiling: black (hot), white (neutral), and green or bare copper (ground).
- Connect the black wire from the fan to the black wire from the ceiling, the white wire to the white wire, and the green or bare copper wire to the green or bare copper wire.
- Securely fasten all wire connections with wire nuts.
4. Mounting the Fan
Mount the fan to the ceiling bracket as follows:
- Lift the fan assembly and align the mounting bracket with the holes on the ceiling bracket.
- Insert the screws provided and tighten them securely.
- Attach the canopy to the ceiling bracket, covering the mounting screws.
5. Balancing the Fan
To ensure smooth operation, balance the fan using the following steps:
- Turn on the fan and allow it to reach maximum speed.
- If the fan wobbles, turn it off and locate the blade that is tilted downward.
- Insert the blade balancing kit weight on the opposite side of the tilted blade, near the tip.
- Repeat steps 1-3 until the fan operates smoothly without wobbling.
6. Installing the Light Kit (Optional)
If you have purchased a light kit for the fan, follow these instructions:
- Turn off the power at the circuit breaker or fuse.
- Connect the light kit wires to the corresponding wires from the fan.
- Secure the light kit to the fan housing and install the bulbs.
7. Operation and Maintenance
Once the installation is complete, you can operate the fan and perform regular maintenance to ensure it functions optimally:
- Use the remote control or wall switch to adjust fan speed and lighting.
- Clean the fan blades regularly with a soft cloth to prevent dust accumulation.
- Lubricate the fan motor annually to ensure smooth operation.

Hampton Bay Hawkins 44 In Ceiling Fan Owners Manual 122 855

Hampton Bay 44 In Hawkins Owner S Manual Manualslib

Hampton Bay Hawkins 44 Ceiling Fan Owner S Manual Instructions

44 Hawkins Iii Tal

44 Hawkins Iii Tal

44 Hawkins Tal

44 Hawkins Tal

Hampton Bay Part Yg204i Bn D Hawkins 44 In Indoor Brushed Nickel Ceiling Fan With Light Kit Fans Home Depot Pro

44 Hawkins Tal

Hampton Bay Part Yg204ci Wh Hawkins 44 In Led White Ceiling Fan With Light Kit Fans Home Depot Pro
Related Posts