Essential Aspects of Removing a Ceiling Fan Remote Receiver
Removing a ceiling fan remote receiver can be a straightforward task with the right tools and a step-by-step approach. For safety reasons, it's important to turn off the power at the main electrical panel before beginning any work. Here are the essential aspects to consider when removing a ceiling fan remote receiver:
Identifying the Location of the Remote Receiver
Locate the remote receiver unit, which is typically a small box attached to the ceiling fan's motor housing. It may be hidden inside a canopy or cover, so inspect the fan's components carefully.
Disconnecting the Power Supply
Turn off the power at the main electrical panel before working on the ceiling fan. Locate the circuit breaker or fuse associated with the fan and switch it to the "off" position.
Removing the Remote Receiver Unit
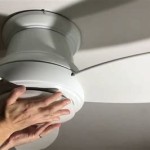
Once the power is disconnected, carefully remove the canopy or cover of the ceiling fan to expose the wiring and components. Identify the remote receiver unit and disconnect the wires connected to it. Note the position and orientation of the wires for reassembly later.
Unscrewing the Remote Receiver
In most cases, the remote receiver is secured with screws. Use a screwdriver to remove the screws and carefully detach the remote receiver from the ceiling fan's motor housing.
Checking for Additional Wiring
Before completely removing the remote receiver, check if there are any additional wires or connections attached to it. If there are any wires, disconnect them carefully and label them for easy reconnection.
Replacing the Canopy or Cover
Once the remote receiver is removed, replace the canopy or cover of the ceiling fan. Ensure that all screws are tightened securely and the unit is properly secured.
Restoring Power and Testing
Turn the power back on at the main electrical panel and test the ceiling fan to ensure it operates correctly without the remote receiver. If there are any issues, double-check the wiring and connections.
Additional Tips
Here are some additional tips to help make the removal of a ceiling fan remote receiver easier:
- Take pictures of the wiring and components before disconnecting anything for reference later.
- Use a non-contact voltage tester to confirm that the power is off before touching any wires.
- If you are unsure about any aspect of the process, it is always advisable to consult with a qualified electrician.
By following these steps, you can safely and effectively remove a ceiling fan remote receiver. Remember to work carefully and prioritize safety throughout the process.

How To Remove Receiver Remote From Ceiling Fan Tiktok Search

How To Install A Ceiling Fan Remote Diy Family Handyman

How To Make Your Ceiling Fan Remote Control Operated

Ceiling Fan Remote Troubleshooting The Home Depot

Ceiling Fan Remote Control Information Do You Need A

Ceiling Fan Remote Troubleshooting The Home Depot

42 Inch Black Ceiling Fan With Light And Remote Control Low Profile 3 Color Change 6 Sds Timer Flush Mount For Living Room Dining

Oaning 36 In Integrated Led Indoor Silver Modern Retractable 3 Color Change Ceiling Fan With Remote Control Hg Hcx 2746 Us The Home Depot

Modern Solid Wood Three Color Indoor Smart Change Removable Remote Control Ceiling Fan China Light Made In Com

Universal Fan Light Remote Control With Receiver 99770 Homeco Plus Appliances Cabinets And Much More
Related Posts