How to Remove Light Bracket from Ceiling
It is crucial to consider essential aspects when removing light brackets from the ceiling, as this task requires safety precautions and understanding of the electrical system. Understanding the type of bracket, the proper tools to use, safety measures, and wiring connections is vital to ensure a successful and hazard-free process. This article will focus on these essential aspects to provide you with a comprehensive guide on removing light brackets from ceilings safely and efficiently.
Essential Aspects of Removing Light Bracket from Ceiling
1. Identifying the Bracket Type
There are various types of light brackets, including flush mount, semi-flush mount, and hanging pendants, each with unique mounting mechanisms. Identifying the type of bracket installed will guide you in selecting the appropriate tools and removal technique.
2. Safety First
Before starting, turn off the power supply to the light fixture at the circuit breaker panel. Use a non-contact voltage tester to ensure the electricity is off. Wear safety glasses and gloves for protection from falling debris or sharp edges.
3. Gathering Necessary Tools
Depending on the bracket type, you will need tools such as a screwdriver (Phillips or flathead), wrench, pliers, wire cutters, electrical tape, and a ladder or step stool for reaching the ceiling.
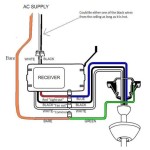
4. Disconnecting Electrical Wires
Once the fixture is detached from the bracket, you will need to disconnect the electrical wires. Carefully identify the wires (usually black, white, and ground) and disconnect them from the light fixture and ceiling wires using wire nuts or electrical tape. Ensure secure connections to prevent electrical hazards.
5. Removing Mounting Hardware
Locate the screws or bolts holding the bracket to the ceiling and remove them using the appropriate screwdriver or wrench. Carefully support the light fixture to prevent it from falling. If the bracket is glued or adhered, use a putty knife or a solvent to loosen the bond.
6. Detaching the Bracket
Once the mounting hardware is removed, gently pull the bracket away from the ceiling. Inspect the bracket for any remaining wires or debris and remove them. If the bracket is stuck, apply slight force or use a pry bar to loosen it.
7. Cleanup and Inspection
Once the bracket is removed, clean the ceiling surface and inspect the electrical wires for any damage. If necessary, repair or replace damaged wires and restore power to the circuit. Reconnect the light fixture to the new bracket or ceiling, ensuring secure connections.

How To Replace Install A Light Fixture The Art Of Manliness

How To Replace Install A Light Fixture The Art Of Manliness

How To Replace A Ceiling Fan With Pendant Light

How To Replace Install A Light Fixture The Art Of Manliness

How To Remove A Light Fixture 2 Best Ways

How To Remove A Light Fixture 2 Best Ways

How To Remove A Light Fixture 2 Best Ways
How To Replace A Light Fixture With Ceiling Fan Projects By Peter

Modern Ceiling Lights Home Repair Tutor

How To Change A Light Fixture
Related Posts