How to Install Profile Light in False Ceiling
Installing profile lights in false ceilings is an essential aspect of modern interior design. Profile lights provide ambient lighting, accentuate architectural features, and enhance the overall aesthetics of a space. Understanding the key aspects of profile light installation ensures a seamless and visually appealing result.
This article delves into the essential aspects of installing profile light in false ceilings, providing a comprehensive guide for homeowners, DIY enthusiasts, and professional installers. By following the steps outlined below, you can create a stunning and functional lighting scheme that transforms your interior space.
1. Planning and Preparation
Planning is crucial before installing profile lights. Determine the desired lighting effect, the number of lights required, and their placement. Consider the size of the room, the ceiling height, and the existing electrical layout. It's also essential to select appropriate profile lights that complement the ceiling design and overall interior style.
2. Electrical Wiring
Proper electrical wiring is essential for safe and efficient profile light installation. Run wires from the electrical source to the designated locations for the lights. Ensure that the wiring meets electrical codes and is concealed within the false ceiling frame. Ideally, use heat-resistant wiring and connect the wires to the lights using insulated connectors.
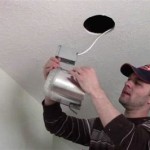
3. Installing the Profile Light Housing
Install the profile light housing into the false ceiling frame according to the manufacturer's instructions. The housing typically consists of an aluminum or PVC base that provides support and alignment for the profile light. Secure the housing firmly using screws or clips and ensure that it is level and properly aligned.
4. Mounting the Profile Light
Carefully mount the profile light into the housing. Check that the light is securely fastened and properly aligned. Some profile lights may have adjustable brackets or screws that allow for precise positioning and angle adjustment. Ensure that the light is oriented correctly to achieve the desired lighting effect.
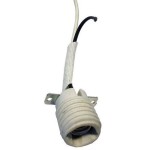
5. Connecting the Power Supply
Connect the profile light to the power supply using the appropriate connectors. Double-check the polarity of the wires and make sure that the connections are tight and secure. Use electrical tape or heat shrink tubing to insulate and protect the connections.
6. Testing and Adjustment
Turn on the profile lights and test their functionality. Adjust the position or angle of the lights if necessary to optimize the lighting effect. Ensure that the lights are emitting the desired amount and direction of light. Make any necessary adjustments until you are satisfied with the result.

Beautiful And Easy To Install Profile Light Ceiling Designs

Top 10 New Ways To Light Up Profile In Ceiling N Lighten

Top 10 New Ways To Light Up Profile In Ceiling N Lighten

Beautiful And Easy To Install Profile Light Ceiling Designs

Top 10 New Ways To Light Up Profile In Ceiling N Lighten

Profile Light In Interiors Ideas And Inspirations

Profile Light Design Make A Morden Look

Profile Light Design Make A Morden Look

Top 10 New Ways To Light Up Profile In Ceiling N Lighten

What Is Profile Light Prayag Lite
Related Posts