Modern ceiling pendant slimline wheel in pleated grey with diffuser där alvaro light small warm antique brass drum shades diy at b q contemporary linen fabric semi flush fixture by happy homewares cierro dia 60cm 3 e27 40cm dar cie5239 black friday deal use bf10 for 10 extra off shade offset glass large pleat silver frosted diameter lighting lights 41004 002 lamp

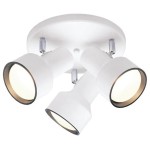
Modern Ceiling Pendant Slimline Wheel In Pleated Grey With Diffuser

Där Alvaro Diffuser Ceiling Light Small Warm Grey Antique Brass

Modern Drum Grey Pendant Ceiling Light Shades With Diffuser Diy At B Q

Contemporary Grey Linen Fabric Semi Flush Ceiling Light Fixture With Diffuser By Happy Homewares

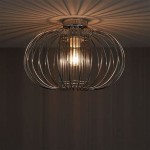
Där Cierro Diffuser Flush Ceiling Light Dia 60cm Grey

Cierro 3 Light E27 Grey Flush Ceiling With Diffuser 40cm Dar Cie5239 Black Friday Deal Use Bf10 For 10 Extra Off

Grey Drum Shade Offset Ceiling Pendant With Glass Diffuser

Cierro 3 Light E27 Grey Flush Ceiling With Diffuser 40cm Dar Cie5239 Black Friday Deal Use Bf10 For 10 Extra Off

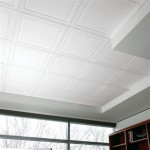
Där Alvaro Diffuser Ceiling Light Large Warm Grey Antique Brass

Drum Pleat 3 Light Pendant Silver With Frosted Glass Diffuser Diameter 60cm Lighting Ceiling Lights

41004 002 Grey Ceiling Lamp With Glass Diffuser

Gruzdz Berlin Leuchten Lampenschirme Lichtobjekte Ceiling Light Made Of Gray Linen

Där Alvaro Diffuser Ceiling Light Large Warm Grey Antique Brass

18 X 14 Led Metal Dimmable Pendant With Diffuser And Hardback Fabric Shade Gray Cal Lighting Target

Ronda 40cm 3 Light Pendant Slate Grey C W Diffuser The Lighthouse

Dar Ronda 60cm Grey Drum Easy Fit Pendant Shade With Diffuser Ron8639

Dar Cie5239 Cierro Grey Fabric With Diffuser Flush

Där Cierro Diffuser Flush Ceiling Light Dia 60cm Grey

Nordic Drum Ceiling Mounted Light With Acrylic Diffuser Black White Led Bedroom Flush Mount 16 19 5 Dia Clearhalo

Lucia Ceiling Pendant Shades With Diffuser Lights And Linen
Modern ceiling pendant slimline wheel där alvaro diffuser light drum grey semi flush fixture cierro e27 shade offset lighting lamp with glass