How to Install an Electrical Ceiling Box
Step 1: Gather Your Tools and Materials
- Electrical ceiling box (size will depend on the fixture you are installing)
- Ceiling box mounting bracket (if necessary)
- Screws
- Drill
- Drill bit (size will depend on the ceiling box)
- Wire cutters
- Pliers
- Electrical tape
Step 2: Turn Off the Power
Before you do anything else, make sure to turn off the power to the circuit that you will be working on. You can do this by flipping the breaker switch or removing the fuse.
Step 3: Locate the Center of the Ceiling
Once the power is off, you need to locate the center of the ceiling. You can do this by measuring the length and width of the ceiling and then dividing each measurement in half. Mark the center of the ceiling with a pencil.
Step 4: Drill a Hole for the Ceiling Box
Use a drill to drill a hole in the ceiling at the center mark. The size of the hole will depend on the size of the ceiling box. Be careful not to drill too large of a hole.
Step 5: Install the Ceiling Box Mounting Bracket (if necessary)
If the ceiling box does not have a built-in mounting bracket, you will need to install one. The mounting bracket will help to secure the ceiling box to the ceiling joists.
To install the mounting bracket, simply screw it into the ceiling joists. Make sure that the screws are long enough to go through the ceiling box and into the joists.
Step 6: Install the Ceiling Box
Once the mounting bracket is installed, you can install the ceiling box. To do this, simply insert the ceiling box into the hole in the ceiling and then screw it into the mounting bracket.
Make sure that the ceiling box is flush against the ceiling. If it is not, you can shim it with a washer or two.
Step 7: Connect the Wires
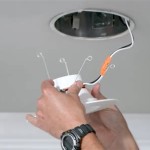
Once the ceiling box is installed, you need to connect the wires. To do this, use wire cutters to strip the insulation off the ends of the wires. Then, twist the exposed wires together and wrap them with electrical tape.
Be sure to connect the wires correctly. The black wire should be connected to the hot terminal, the white wire should be connected to the neutral terminal, and the ground wire should be connected to the ground terminal.
Step 8: Turn on the Power
Once the wires are connected, you can turn on the power. To do this, simply flip the breaker switch or replace the fuse.
Step 9: Test the Ceiling Box
To test the ceiling box, simply screw in a light bulb and turn on the light switch. If the light bulb lights up, the ceiling box is installed correctly.
If the light bulb does not light up, there is a problem with the installation. Check the wires to make sure that they are connected correctly. You may also need to replace the ceiling box.

Electric Box For Ceiling Fan Install Doityourself Com Community Forums
:strip_icc()/SCW_128_02-cefb4c77582c4dbaaba07e619aeacf8f.jpg?strip=all)
How To Install A Ceiling Fan Electrical Box

Repairing A Ceiling Electrical Box

Electric Box For Ceiling Fan Install Doityourself Com Community Forums

Here S How Install Lightweight Box Beam On Ceiling

How To Install A Ceiling Fan Dummies
:strip_icc()/SCW_128_11-7e1617dc2e414228b5d03568d1c7c022.jpg?strip=all)
How To Install A Ceiling Fan Electrical Box

How To Install An Electrical Box When There Is No Stud Mountyourbox

How To Install A Ceiling Light Fixture Diy Family Handyman

Ceiling Fan Junction Box R Electrical
Related Posts

