How To Hook Up A Ceiling Fan With Light
Installing a ceiling fan with a light fixture can significantly enhance a room's comfort and aesthetics. This guide provides a comprehensive walkthrough of the installation process. However, electrical work can be hazardous. If one lacks experience or comfort working with electricity, consulting a qualified electrician is strongly recommended.
Before beginning the installation, gathering the necessary tools and materials is crucial. Typically, these include a ladder, voltage tester, wire strippers, wire nuts, electrical tape, screwdrivers (Phillips and flathead), pliers, and potentially a wire fishing tool. Ensure the new ceiling fan's specifications match the existing electrical box and wiring. Most ceiling fans require a dedicated ceiling fan-rated electrical box.
Safety should be the paramount concern throughout the installation process. Before commencing any work, turn off the power to the circuit at the breaker box. Confirm the power is off by using a voltage tester on the wires in the ceiling box. Double-checking ensures no residual current flows through the wires.
Removing the old fixture is the next step. Carefully disconnect the wires from the old fixture, noting their connections. Most ceiling fans have wires for the fan motor, the light kit, and the ground wire. The house wiring will typically include a black (hot), white (neutral), and green or bare copper (ground) wire. Taking a photograph of the wiring before disconnection can be helpful during the re-wiring process.
Once the old fixture is removed, the mounting bracket for the new ceiling fan should be installed. Ensure the bracket is securely attached to the electrical box, using the appropriate screws and hardware provided with the fan. The bracket must be able to support the weight of the fan. Consulting the fan's installation manual for specific instructions regarding the mounting bracket installation is essential.
With the mounting bracket secure, the wiring process can begin. The fan's ground wire (usually green or bare copper) should be connected to the house's ground wire. Secure the connection with a wire nut and ensure a tight fit. This grounding connection is critical for safety, providing a path for stray electrical current to flow harmlessly to the ground.
Connecting the fan's motor wires to the house wiring follows. The fan typically has a black wire for the fan motor and a blue wire for the light kit. Connect the fan's black wire to the house's black (hot) wire using a wire nut. Similarly, connect the fan's white wire to the house's white (neutral) wire using a wire nut.
If the fan includes a light kit, typically, a blue wire from the fan connects to the black wire from the light kit. Then, the light kit's white wire connects to the house's white (neutral) wire, often combined with the fan's white wire under the same wire nut. Consult the fan's wiring diagram for specific instructions, as wiring configurations might vary slightly between models.
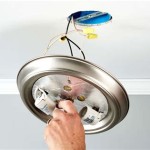
After all wire connections are secure and neatly tucked into the electrical box, the fan assembly can be attached to the mounting bracket. Follow the manufacturer’s instructions carefully, as the attachment method may vary depending on the fan model. Ensure all screws and connections are tightened securely to prevent wobbling or instability.
With the fan securely mounted, the light kit assembly can be installed. This usually involves attaching the light fixture housing to the fan body and connecting the light kit wires to the pre-wired leads from the fan. Install light bulbs of the correct type and wattage as specified in the fan's documentation. Exceeding the recommended wattage could create a fire hazard.
Finally, attach the fan blades to the motor housing according to the manufacturer’s instructions. Balancing the fan blades is an important step to prevent wobbling and noise during operation. Most ceiling fans include a balancing kit to help achieve proper balance. After installation, test the fan's operation by turning the power back on at the breaker box. Verify both the fan and the light function correctly.
Regular maintenance can prolong the lifespan of the ceiling fan and ensure optimal performance. Periodically cleaning the fan blades and checking for loose connections are recommended maintenance practices. If any issues arise, consult the manufacturer's troubleshooting guide or contact a qualified electrician.

Wiring A Ceiling Fan And Light With Diagrams Ptr

Wiring A Ceiling Fan And Light With Diagrams Ptr

Wiring A Ceiling Fan And Light With Diagrams Ptr

How To Wire A Ceiling Fan Temecula Handyman

Wiring A Ceiling Fan And Light With Diagrams Ptr

Wiring A Ceiling Fan And Light With Diagrams Ptr

Wiring A Ceiling Fan And Light With Diagrams Ptr

How To Wire A Ceiling Fan Temecula Handyman

Replacing A Ceiling Fan Light With Regular Fixture Jlc

Replacing A Ceiling Fan Light With Regular Fixture Jlc