Can You Change the Glass on a Ceiling Fan? A Comprehensive Guide
Ceiling fans are a staple in many homes, providing much-needed air circulation and contributing to the overall aesthetic. A common issue that arises with ceiling fans is damage to the glass light globe. This can stem from accidents, age, or simply the desire for a style refresh. This article explores the process of replacing ceiling fan glass, providing a detailed guide for homeowners.
Assessing the Damage and Determining Replacement Needs
Before attempting any replacement, assess the existing glass. Is it simply cracked, or is it completely shattered? The extent of the damage dictates the urgency of the replacement. Furthermore, identify the type of glass currently installed. Is it frosted, clear, or textured? Knowing these details will help in acquiring the correct replacement.
Safety Precautions: Protecting Yourself During the Process
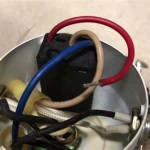
Working with electrical fixtures requires adherence to safety precautions. Always turn off the power to the ceiling fan at the circuit breaker before beginning any work. This crucial step prevents electrical shocks. Additionally, use a stable ladder to reach the fan and have a helper available to steady the ladder and assist with the process if necessary. Wearing safety glasses is also recommended to protect eyes from any falling debris.
Gathering Necessary Tools and Materials
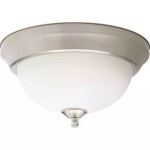
Having the right tools readily available simplifies the replacement process. A screwdriver, typically a Phillips head, is essential for removing screws holding the glass in place. In some cases, a small flathead screwdriver might be necessary. It’s also wise to have replacement screws on hand, as the original screws can sometimes be stripped or damaged. Finally, ensure you have the correct replacement glass globe that matches your ceiling fan model.
Locating Replacement Glass: Finding the Right Fit
Finding the right replacement glass can be challenging. The first step is to identify the make and model of the ceiling fan. This information is often found on a label located on the motor housing of the fan. Once identified, contact the manufacturer directly or search online retailers using the make and model number. If the fan is older or the manufacturer is no longer in business, consider visiting lighting showrooms or salvage yards. Taking accurate measurements of the existing glass globe can also aid in finding a suitable replacement.
Removing the Damaged Glass: A Step-by-Step Guide
With the power off and a stable ladder in place, carefully examine how the existing glass is attached. Most globes are held in place by screws, clips, or a combination of both. If screws are used, carefully remove them with a screwdriver. If clips are involved, gently release them, ensuring not to apply excessive force that might break the already damaged glass. Once all securing mechanisms are released, the glass should detach easily. Carefully lower the damaged glass and dispose of it properly.
Installing the New Glass Globe: Securing the Replacement
Align the new glass globe with the fixture fitting, ensuring it sits correctly. If screws were used to secure the original glass, insert the new screws and tighten them snugly, taking care not to overtighten, which could crack the new glass. If clips were used, gently snap them into place, ensuring a secure fit. Once the glass is secured, inspect it to ensure it is stable and properly positioned.
Testing the Installation: Verifying Functionality and Safety
After installation, restore power to the ceiling fan at the circuit breaker. Turn on the light to confirm the new globe is working correctly. Observe for any flickering or other issues. Visually inspect the glass one last time to ensure it is secure and not wobbling or loose. If any problems are observed, turn off the power again and re-examine the installation to identify and correct any issues.
Maintenance and Care: Prolonging the Lifespan of Your Ceiling Fan Glass
Regular cleaning can extend the life of your ceiling fan glass. Dust and debris can accumulate, potentially impacting light output and creating a fire hazard. Turn off the power to the fan and gently wipe the glass with a soft, damp cloth. Avoid using abrasive cleaners, which could scratch the surface. Regularly inspect the glass for any cracks or chips, replacing it promptly if damage is detected. Proper maintenance will ensure optimal performance and longevity.
Alternative Solutions: Exploring Fan Upgrade Options
Replacing just the glass offers a cost-effective way to refresh the appearance of a ceiling fan. However, if the fan itself is outdated or malfunctioning, consider upgrading to a newer, more energy-efficient model. Modern ceiling fans often come with integrated LED lights, which consume less energy and last longer than traditional incandescent bulbs. Upgrading the entire fan can improve both the aesthetic and functionality of the space.

I Made A New Ceiling Fan Shade To Replace The Original Glass One That Broke R Somethingimade

Private Brand Unbranded Windward Iv Ceiling Fan Replacement Glass Bowl 082392053475

Better Homes Gardens 5 Clear Seeded Glass Ceiling Fan Replacement Shade

Private Brand Unbranded Windward Iv Ceiling Fan Replacement Glass Bowl 082392053475

Replacement Glass Bowl For Lyndwood Oil Rubbed Broe And Sibley Vintage Brass Ceiling Fans 08239204240 The Home Depot

Cali Ceiling Fan Replacement Glass Lighting Fans Today S Design House

Treviento Ceiling Fan Replacement Glass

Hampton Bay Replacement Etched Opal Glass For Pilot 60 In And 52 Brushed Nickel Ceiling Fan G04313

Treviento Ceiling Fan Replacement Glass

Better Homes Gardens 5 Clear Seeded Glass Ceiling Fan Replacement Shade
Related Posts