Essential Aspects of Removing a Ceiling Light: A Comprehensive Guide
Removing a ceiling light may seem like a daunting task, but it's a straightforward process that can be completed safely with a few essential steps. By understanding the critical aspects of this task, you can ensure a successful removal without any accidents or damage.
This article will focus on the 7 essential aspects of removing a ceiling light, including safety precautions, tools and materials required, step-by-step instructions, troubleshooting common issues, clean-up and disposal, and additional tips for efficient and effective removal.
1. Safety Precautions
Safety should be your top priority when removing a ceiling light. Remember to cut off power at the circuit breaker before starting, and wear gloves and safety glasses to protect yourself from falling debris or electrical shocks.
2. Tools and Materials Required
Gather the necessary tools and materials before starting the removal process. These include a screwdriver, wire cutters, a voltage tester, and a ladder or step stool. If the ceiling light is heavy, you may also need an assistant to help support it.
3. Step-by-Step Instructions
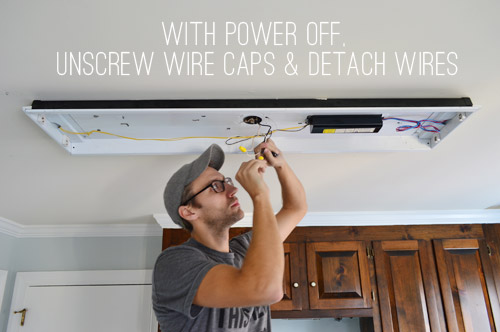
Follow the step-by-step instructions carefully to remove the ceiling light safely. Start by removing the light fixture, disconnect the wires, then remove the mounting bracket and the ceiling light itself.
4. Troubleshooting Common Issues
Encountering common issues during the removal process is possible. These issues may include stuck bolts, broken wires, or difficulty removing the fixture. This article will provide troubleshooting tips to help you address these issues effectively.
5. Clean-Up and Disposal
After removing the ceiling light, clean the area thoroughly and dispose of the old light fixture and any debris properly. Follow local regulations for safe disposal of electrical waste.
6. Additional Tips
To make the removal process more efficient and effective, follow these additional tips. Use proper lighting to ensure good visibility. Take pictures of the wiring setup before disconnecting to help with reinstallation. And label the wires to avoid confusion when reconnecting.
7. Conclusion
Removing a ceiling light requires careful planning and execution. By understanding the essential aspects outlined in this article, you can approach the task with confidence and complete it safely and efficiently. Follow the steps carefully, troubleshoot any issues that may arise, and don't hesitate to seek assistance if needed.

The Genius Way To Handle Light Fixtures When Painting Your Ceiling

How To Change A Ceiling Light Making Maanita

How To Replace Install A Light Fixture The Art Of Manliness

How To Remove A Light Fixture In 6 Steps Apartment Therapy

How To Remove Ceiling Light Cover With No S All Coast Inspections

How To Replace A Ceiling Light Home

How To Replace Led Ceiling Light Leng8021

How Do I Remove These Ceiling Lights To Replace The Bulb R Fixit

How To Replace An Old Fluorescent Light Fixture Young House Love

Replacing Flush Mount Light With Pendant
Related Posts


