Adding a New Ceiling Light Fixture: A Comprehensive Guide
Upgrading your home lighting is a simple but effective way to enhance its ambiance and functionality. One of the most common and transformative changes you can make is adding a new ceiling light fixture. Whether you're replacing an existing fixture or installing one in a new location, the process is relatively straightforward if you follow the right steps.
Planning the Installation
Before you begin, it's crucial to plan the installation carefully. Consider the following factors:
- Fixture Type: Choose a fixture that complements the style of your room and the amount of light you need.
- Location: Determine the ideal location for the fixture, ensuring it provides adequate illumination and complements the layout of your space.
- Electrical Requirements: Check the voltage and amperage requirements of the fixture to ensure your electrical system can support it.
- Tools and Materials: Gather the necessary tools and materials, including a ladder, screwdriver, wire strippers, electrical tape, and the new light fixture.
Safety Precautions
Electrical work can be dangerous, so always prioritize safety:
- Turn Off the Power: Before starting any work, switch off the circuit breaker or unscrew the fuse that powers the ceiling light.
- Use Insulated Tools: Always use insulated tools when working with electricity.
- Wear Protective Gear: If possible, wear gloves, safety glasses, and a hard hat.
- Test the Wires: Use a voltage tester to ensure the wires are de-energized before touching them.
Installing the Fixture
Once you have prepared adequately, follow these steps to install the fixture:
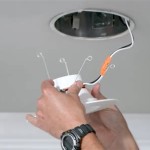
- Remove the Old Fixture: If applicable, carefully remove the existing light fixture, following its specific instructions.
- Connect the Wires: Connect the black wire from the fixture to the black wire from the ceiling box, the white wire to the white wire, and the ground wire to the ground wire.
- Mount the Fixture: Attach the mounting bracket to the electrical box and secure the fixture according to the manufacturer's instructions.
- Install the Bulbs: Insert the appropriate bulbs into the fixture.
- Turn On the Power: Restore power to the circuit and test the new light fixture.
Troubleshooting
If you encounter any issues, troubleshoot the following:
- No Light: Check if the power is switched on, the bulbs are properly installed, and the wires are connected securely.
- Dim or Flickering Light: Verify the bulbs are the correct wattage and the wires have good contact.
- Overheating: Shut off the power immediately and consult a qualified electrician to inspect the fixture and wiring.
Conclusion
Adding a new ceiling light fixture is a rewarding home improvement project that can significantly enhance the ambiance and illumination of your space. By following these steps carefully, you can add a touch of personalization and functionality to your home while ensuring a safe and reliable installation.

Mounting Light Fixtures Fine Homebuilding

Replacing A Ceiling Fan Light With Regular Fixture Jlc
Replacing A Ceiling Fan Light With Regular Fixture Jlc

How To Install A Light Fixture Diy Home Improvement

How To Install A Ceiling Light Fixture Diy Family Handyman

How To Install A Ceiling Light Fixture Diy Family Handyman

How To Install A New Light Fixture Apartment Therapy

Extending A Lighting Circuit Step By Guide And

How To Install A Light Fixture Diy Guide

How To Install Ceiling Light Fixtures Ehow
Related Posts


