Essential Aspects of Arlec Remote Control Ceiling Fan Installation
Arlec Remote Control Ceiling Fan Installation is a noun that refers to the process of installing a ceiling fan that is controlled by a remote control. It is important to consider the essential aspects of this process to ensure a safe and successful installation. These aspects include understanding the different parts of the fan, assembling the fan, mounting the fan, and wiring the fan.
This article will focus on the essential aspects of Arlec Remote Control Ceiling Fan Installation, providing a comprehensive guide to help you through the process. We will cover each aspect in detail, so you can be confident that your fan is installed correctly and safely.
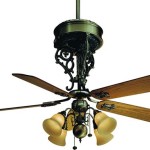
Understanding the Different Parts of the Fan
The first step in installing an Arlec Remote Control Ceiling Fan is to understand the different parts of the fan. This will help you to assemble the fan correctly and ensure that all of the parts are in good working order.
The main parts of an Arlec Remote Control Ceiling Fan include the following:
- Fan motor
- Fan blades
- Downrod
- Canopy
- Remote control
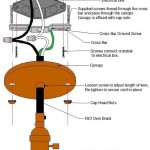
Assembling the Fan
Once you have identified the different parts of the fan, you can begin assembling the fan. It is important to follow the manufacturer's instructions carefully to ensure that the fan is assembled correctly.
The general steps for assembling an Arlec Remote Control Ceiling Fan are as follows:
- Attach the fan blades to the fan motor.
- Install the downrod into the fan motor.
- Attach the canopy to the ceiling.
- Hang the fan from the canopy.
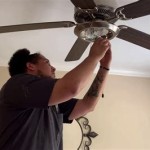
Mounting the Fan
Once the fan is assembled, you can mount the fan to the ceiling. It is important to make sure that the fan is mounted securely to ensure that it does not fall and cause injury.
The general steps for mounting an Arlec Remote Control Ceiling Fan are as follows:
- Locate the ceiling joists.
- Drill pilot holes into the ceiling joists.
- Insert the mounting screws into the pilot holes.
- Hang the fan from the mounting screws.
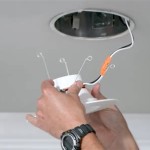
Wiring the Fan
The final step in installing an Arlec Remote Control Ceiling Fan is to wire the fan. It is important to follow the manufacturer's instructions carefully to ensure that the fan is wired correctly.
The general steps for wiring an Arlec Remote Control Ceiling Fan are as follows:
- Turn off the power to the ceiling fan circuit.
- Connect the black wire from the fan to the black wire from the ceiling.
- Connect the white wire from the fan to the white wire from the ceiling.
- Connect the green wire from the fan to the ground wire from the ceiling.
- Turn on the power to the ceiling fan circuit.
Conclusion
Installing an Arlec Remote Control Ceiling Fan is a relatively simple process, but it is important to follow the manufacturer's instructions carefully to ensure that the fan is installed correctly and safely. By following these essential aspects, you can be confident that your fan will provide you with years of trouble-free operation.

Ceiling Fan

Arlec Ceiling Fan Remote Control Instructions Dcf5240

Arlec Dcf6060 Assembly And Installation Manual Manualslib

Arlec 130cm White Blades Grid Connect Arizona Smart Ceiling Fan Brand

Arlec Grid Connect Ceiling Fans Hardware Home Assistant Community

Arlec Remote Control Ceiling Fan Kit Brand

Ceiling Fan Wiring Diagram

My Wireless Remote Control Ceiling Fan Has A Gray Red And Yellow Wire Labeled To Motor Coming From The Transponder Where Do I Connect Toggle Switch

Arlec 130cm White 4 Blade Grid Connect Smart Dc Ceiling Fan With Led Light And Remote Bunnings New Zealand

Arlec Grid Connect Review Ceiling Fan Choice
Related Posts