How to Install a Ceiling Fan Light Kit: A Comprehensive DIY Guide
Adding a ceiling fan with a light kit is a great way to improve the style and functionality of any room in your home. While it may seem daunting, this task is relatively easy to complete with the right tools and materials. Here's a step-by-step guide to help you install a ceiling fan light kit safely and efficiently:
1. Gather Tools and Materials
Before you begin, gather the following tools and materials:
- New ceiling fan light kit
- Screwdriver (Phillips and flathead)
- Wire cutters
- Electrical tape
- Ladder
- Safety glasses
2. Safety Precautions
Working with electricity can be dangerous, so it's important to take the necessary safety precautions:
- Turn off the power to the ceiling fan circuit at the electrical panel or fuse box.
- Use a non-contact voltage tester to ensure that the power is off.
- Wear safety glasses for eye protection.
- Follow all instructions carefully and consult an electrician if you encounter any difficulties.
3. Remove Existing Light Fixture
If there is an existing light fixture where you want to install the ceiling fan, you need to remove it first:
- Unplug the light fixture from the outlet.
- Disconnect the wires by loosening the wire nuts and pulling them apart.
- Remove the mounting bracket from the ceiling.
4. Install Ceiling Fan Canopy
The canopy is the part of the ceiling fan that covers the electrical components and attaches to the ceiling:
- Place the canopy over the electrical box on the ceiling.
- Secure the canopy to the electrical box using the provided screws.
5. Connect Wires
Now it's time to connect the wires from the ceiling fan light kit to the wires in the electrical box:
- Strip about 1/2 inch of insulation from the ends of the wires.
- Connect the black wire from the fan to the black wire in the box.
- Connect the white wire from the fan to the white wire in the box.
- Connect the green or bare copper ground wire from the fan to the ground wire in the box.
- Secure all connections with wire nuts.
6. Install Mounting Bracket
The mounting bracket is what supports the ceiling fan from the ceiling:
- Slide the mounting bracket over the canopy.
- Tighten the screws on the side of the mounting bracket to secure it to the canopy.
7. Hang Ceiling Fan
With the wiring and mounting bracket in place, you can now hang the ceiling fan:
- Lift the ceiling fan onto the mounting bracket.
- Turn the ceiling fan clockwise until it is securely in place.
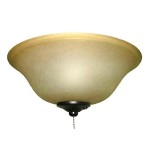
8. Install Light Fixture
Now it's time to install the light fixture that came with the ceiling fan kit:
- Attach the light fixture to the ceiling fan according to the manufacturer's instructions.
- If the light fixture includes bulbs, install them now.
9. Finish Installation
Once the light fixture is installed, you can finish the installation:
- Turn the power back on at the electrical panel or fuse box.
- Test the ceiling fan and light fixture to make sure they are working properly.
- Enjoy the improved airflow and lighting in your room!
Installing a ceiling fan light kit is not a difficult task, but it does require some basic electrical knowledge and tools. By following this guide carefully and taking the necessary safety precautions, you can complete this project successfully and enhance the comfort and style of your home.

Diy Light Kit Inspiration How To S Bean In Love

Unique Diy Light Kit Prestige Fans

Add A Drum Shade To Ceiling Fan In Minutes Thrifty Decor Diy And Organizing

How To Update A Ceiling Fan Without Removing It Savvy Apron

How To Install A Ceiling Fan With Light Girl S Guide Home Diy

Ceiling Fan Light Kit Installation How To

Parrot Uncle 48 In Distressed Iron Flush Mount Cage Matte Black Ceiling Fan With Light Kit And Remote Control F6343110v The Home Depot

Retro Revival Mid Century Inspired Ceiling Fan Dream Green Diy

Unique Diy Light Kit Prestige Fans

Private Brand Unbranded Hugger 52 In Led Indoor Black Ceiling Fan With Light Kit Al383led Bk The Home Depot
Related Posts


