Fan accessories replacement glass for diffe ceiling fans the lighting martec precision light cover diffuser preglass spot 4 ways to replace a bulb in wikihow westinghouse 724756910 fixture shade lightbulbs com frosted opal ligh mm electrical merchandising bowl seeded finish 133 dan s city parts aspen creative corporation 5 8 alabaster pack 23062 home depot carro smart espear series rp 1rp8g 10 led kit department at

Fan Accessories Replacement Glass For Diffe Ceiling Fans The Lighting

Martec Precision Replacement Glass Light Cover Diffuser Preglass

Martec Ceiling Fan Replacement Glass Light Spot

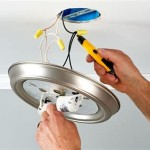
4 Ways To Replace A Light Bulb In Ceiling Fan Wikihow

Westinghouse 724756910 Light Fixture Shade Lightbulbs Com

4 Ways To Replace A Light Bulb In Ceiling Fan Wikihow

Replacement Glass Frosted Opal Ceiling Fan Ligh Mm Electrical Merchandising

Ceiling Fan Glass Bowl Light In Seeded Finish 133 Dan S City Fans Parts Accessories

Aspen Creative Corporation 4 5 8 In Alabaster Ceiling Fan Replacement Glass Shade Pack 23062 The Home Depot

Replacement Light Cover For Carro Smart Ceiling Fans Espear Series

Rp Lighting Fans Replacement Glass 1rp8g 10 In Frosted Led Ceiling Fan Light Kit The Parts Department At Com

Better Homes Gardens 5 1 Frosted White Glass Ceiling Fan Replacement Shade Com

Harbor Breeze 3 In X 10 Globe Opal Ceiling Fan Light Shade Lip Fitter The Shades Department At Com

Ceiling Fan Dome Removal

Fg252134 Replacement Glass Mercator Bitola Lighting And Fans

Better Homes Gardens 5 1 Clear Glass Ceiling Fan Replacement Shade Com

How To Replace A Fan Light Cover Bunnings Work Community

How To Remove Dome Globe Glass Light Replacement On Hampton Bay Ceiling Fan Windward Ii

Ceiling Fan Light Kit Only Of Modern Milk Glass Globes Flush
Fan accessories replacement glass for martec precision ceiling replace a light bulb in westinghouse 724756910 fixture frosted opal bowl seeded aspen creative corporation carro smart fans espear series rp lighting