Essential Aspects of Ceiling Fan Light Wiring with Two Switches
Installing a ceiling fan with two switches involves some crucial wiring considerations. Here's a comprehensive guide to help you understand the essential aspects and ensure a safe and functional installation:
1. Safety First
Before beginning any electrical work, it is imperative to turn off the power at the main electrical panel. Ensure that the circuit is indeed dead using a non-contact voltage tester. This crucial step minimizes the risk of electrical shock and ensures your safety.
2. Identify the Wiring
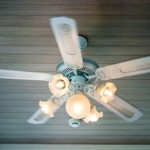
Ceiling fans typically come with three or four wires: black (hot), white (neutral), green (ground), and sometimes blue (light). The black wire carries power, the white wire completes the circuit, the green wire protects against electrical shock, and the blue wire provides power to the light fixture.
3. Connecting the Fan and Light to One Switch
If you wish to control both the fan and the light with a single switch, connect the black wire from the fan to the black wire from the switch. Similarly, connect the white wire from both the fan and the light to the white wire from the switch. Finally, attach the green ground wire from the fan, the light, and the switch together using a wire nut. Ensure all connections are secure.
4. Connecting the Light to a Separate Switch
To control the light separately, connect the black wire from the light to the black wire from the second switch. Connect the white wire from the light to the white wire from the switch. Finally, connect the green ground wire from the light to the green ground wire from the switch.
5. Connecting the Fan to the Other Switch
To control the fan separately, connect the black wire from the fan to the black wire from the second switch. Connect the white wire from the fan to the white wire from the switch. Again, connect the green ground wire from both the switch and the fan together using a wire nut.
6. Finishing Touches
After connecting all the wires, tuck them neatly into the junction box and secure them using wire nuts or electrical tape. Ensure there are no exposed wires to prevent any potential hazards. Finally, turn on the power at the main electrical panel and test the operation of both switches to confirm they control the fan and light as intended.
Wiring a ceiling fan with two switches requires careful attention to detail and a thorough understanding of electrical principles. By following these steps, you can ensure a safe and functional installation that will enhance the comfort and functionality of your space.

Wiring A Ceiling Fan And Light With Diagrams Ptr

Ceiling Fan Wiring Diagram Two Switches

Wiring A Ceiling Fan And Light With Diagrams Ptr

How To Install A Ceiling Fan Two Wall Switches What Bb Built

Need Feedback On Wiring Fan And Switch With Smartswitches Projects Stories Smartthings Community

Ceiling Fan Switch Wiring Electrical 101

How To Wire A Ceiling Fan Control Using Dimmer Switch

Help Needed On Going From Fan W Light With Two Switches To And Separate Lights Same R Askanelectrician

Wiring A Ceiling Fan And Light With Diagrams Ptr

How To Wire A Ceiling Fan For Separate Control Fo The And Light
Related Posts