Mastering Ceiling Fan Replacement Lights: A Comprehensive Guide
Ceiling fans are indispensable fixtures in many homes, providing both ventilation and illumination. When the lights on your ceiling fan start to dim or fail, it's time to consider a replacement. Replacing a ceiling fan light is a relatively straightforward task that can be completed in a few simple steps.
Safety First
Before embarking on any electrical work, it's crucial to ensure your safety. Turn off the power to the ceiling fan at the circuit breaker or fuse box. Check that the power is indeed off by flipping the fan switch. Use a ladder that is tall enough to reach the fan comfortably, ensuring its stability by placing it on a flat surface and extending its legs fully.
Identifying the Ideal Light Kit
Ceiling fan replacement light kits come in a wide variety of styles and designs. Consider the existing decor of your room when choosing a new light kit. You'll also need to determine the appropriate size for your fan and the necessary wattage. Most ceiling fans can accommodate light kits with a socket size of E26 or E27 and have a maximum wattage limit. Refer to your fan's manual or consult a professional electrician to confirm the specifications.
Step-by-Step Replacement Guide
1. Globe Removal: Carefully grasp the glass globe or shade of the existing light kit and rotate it counterclockwise to detach it. If the globe is stuck, gently pry it loose using a flat-head screwdriver wrapped in a cloth to avoid scratching the surface.
2. Bulb Removal: Once the globe is removed, unscrew the bulb from the socket by turning it counterclockwise. Dispose of the old bulb safely.
3. Light Kit Detachment: Locate the screws holding the light kit in place, typically situated around the base of the fan motor. Use a screwdriver to remove the screws and gently lower the light kit from the fan.
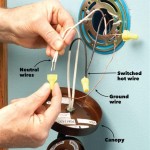
4. Wiring Disconnection: Disconnect the wires connecting the light kit to the fan by unscrewing the wire nuts and pulling the wires apart. Take note of the wire colors and their corresponding connections for proper reassembly.
5. New Light Kit Installation: Align the new light kit with the fan motor and lift it into place. Secure it with the mounting screws, ensuring they are adequately tightened.
6. Wiring Connection: Connect the wires from the new light kit to the fan wires, matching the colors and using wire nuts to secure the connections. Tighten the wire nuts firmly by hand or using pliers.
7. Reassembly: Place the light kit globe or shade back on the light kit and rotate it clockwise to lock it into place. Ensure it is secure and facing the desired direction.
8. Power Restoration: Return to the circuit breaker or fuse box to turn the power back on. Flip the fan switch to verify that the new light kit is functioning correctly.
Additional Considerations
For added convenience and energy efficiency, consider installing dimmable light bulbs or LED bulbs in your ceiling fan light kit. If you encounter any difficulties or have concerns during the replacement process, do not hesitate to consult a qualified electrician.
By following these steps and adhering to the safety guidelines, you can successfully replace the lights on your ceiling fan, restoring its illuminating function and enhancing the aesthetics of your living space.

Smd Cct Led 24w Replacement Light Kit Plate Ceiling Fans Warehouse

6 Led Ceiling Fan Lights Replacement Ultra Thin Retrofits Kit 6000k Daylight

6 Led Ceiling Fan Lights Replacement Ultra Thin Retrofits Kit 6000k Daylight

Replacement Led Light Panel For Claro Dc Ceiling Fan 18 W Cct

Fan Accessories Replacement Glass For Diffe Ceiling Fans The Lighting

Ceiling Fan Glass Bowl Light In Seeded Finish 133 Dan S City Fans Parts Accessories

Swap To Brighter Led Light In Ceiling Fan Doityourself Com Community Forums

Replacement Light Cover For Carro Smart Ceiling Fans To Series

24w 6500lm Ceiling Led Light Replacement Engine Retrofit Fan Kit

Fan Accessories Replacement Glass For Diffe Ceiling Fans The Lighting


