Ceiling Light Fixture Fitting
Properly installed ceiling light fixtures enhance a room's ambiance and functionality. A successful installation requires careful planning, the right tools, and a thorough understanding of electrical safety. This article provides a comprehensive guide to fitting ceiling light fixtures, covering key aspects from preparation to final connections.
Safety First
Working with electricity always carries inherent risks. Before commencing any electrical work, turn off the power at the circuit breaker. Confirm the power is off using a non-contact voltage tester. Double-checking ensures safety and prevents electrical shocks. If unsure about any aspect of the installation, consult a qualified electrician.
Using appropriate personal protective equipment (PPE) is also essential. This includes safety glasses to protect eyes from debris and insulated gloves to minimize risk when handling wires. A stable ladder or platform ensures safe access to the ceiling and reduces the risk of falls.
Understanding Fixture Types
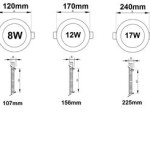
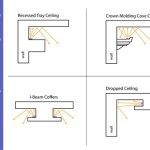
Ceiling light fixtures come in various types, each with unique installation requirements. Understanding the specific type of fixture being installed is crucial for a smooth process. Common types include flush-mount fixtures, semi-flush fixtures, chandeliers, and pendant lights. Flush-mount fixtures sit directly against the ceiling, ideal for rooms with low ceilings. Semi-flush fixtures hang slightly from the ceiling, offering more decorative options. Chandeliers and pendant lights hang further down, making them suitable for rooms with higher ceilings.
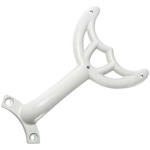
Each fixture type utilizes different mounting methods. Some may require a mounting bracket to be secured to the ceiling electrical box, while others may connect directly. Consult the manufacturer's instructions for the specific fixture being installed as they provide detailed guidance on the necessary mounting hardware and assembly steps.
Preparing for Installation
Preparation is key to a successful installation. Begin by gathering the necessary tools, which typically include a screwdriver, wire strippers, wire connectors, a voltage tester, and possibly a drill depending on the fixture and ceiling type. Having these tools readily available streamlines the process.
Next, remove the old fixture if applicable. After turning off the power, carefully disconnect the wires from the old fixture and remove the mounting hardware. Inspect the electrical box for damage and ensure it is securely fastened to the ceiling. If the box is loose or damaged, address these issues before proceeding with the new fixture installation.
Understanding the wiring is crucial. Most fixtures use three wires: black (hot), white (neutral), and green or bare copper (ground). Identify the corresponding wires from the ceiling and the new fixture. If the wiring seems complex or if there are any doubts, consulting a qualified electrician is recommended.
Connecting the Fixture
Connecting the wires correctly is critical for the fixture's proper operation and safety. Using appropriately sized wire connectors, join the wires from the fixture to the corresponding wires from the ceiling. The black wire from the fixture connects to the black wire from the ceiling, the white wire to the white wire, and the ground wire to the ground wire in the electrical box. Securely fasten the wire connectors to ensure a tight connection.
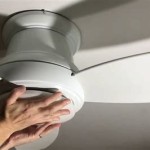
After the wiring is complete, carefully tuck the wires into the electrical box and mount the fixture to the ceiling according to the manufacturer's instructions. Securely tighten all screws and connections to ensure stability. Once the fixture is mounted, install the light bulbs and restore power to the circuit. Test the fixture to verify it is working correctly.
Final Checks and Troubleshooting
After installation, conduct a final check to ensure everything is functioning as expected. Turn on the light switch to verify the fixture illuminates correctly. If the fixture does not light up, double-check the connections and ensure the power is on. If the problem persists, refer to the manufacturer’s instructions or consult an electrician.
Regular maintenance can prolong the lifespan of the fixture. Periodically clean the fixture and check for any loose connections or damaged parts. If any issues are identified, address them promptly to prevent further problems.
By following these steps and prioritizing safety, individuals can successfully install ceiling light fixtures and enhance the aesthetics and functionality of their living spaces. However, always prioritize safety and seek professional assistance when needed.

Ceiling Light Fittings At 4000 Unit In Bengaluru Id 22502792248

Delite Led Ceiling Light Fittings For Office At 9000 Piece In Mumbai Id 23662686233

Hdc Modern Acrylic Ceiling Light Fitting Metal Spot For Kitchen Living Bedroom Hallway Dining Room Fixture At 5799 00 Lights Id 2853219996848

Led Ceiling Light Fittings Services In Hyderabad Id 23442655073

Lepro Le 13 Inch 24w Flush Mount Led Ceiling Light Ubuy

Ledolux 15w Round Neutral White 4000k Led Surface Mounted Ceiling Light For Home Office Kitchen Hallway Living Room Flush Fittings Energy Class A No False Required Lamp In

Bedroom Living Fittings Led Decor Home Lighting Fixtures Modern Lamp Ceiling Light Crystal Made In China Com

How To Fit Ceiling Lights Lighting Electrical Security B Q

False Ceiling Light Fitting Service In Kashipur Id 2853503298497

Hdc 2 Lights Modern Acrylic Ceiling Light Fitting Metal Spot For Kitchen Living Bedroom Hallway Dining Room Fixture A2b International Private Limited At 6999 00 New Delhi Id 2853219989091
Related Posts