Ceiling Light Mount Brackets: A Comprehensive Guide
Ceiling light mount brackets serve as the crucial link between electrical wiring and light fixtures. They provide a secure and stable platform for various lighting types, from chandeliers and pendant lights to flush mounts and track lighting. Understanding the different types, materials, and installation procedures associated with these brackets is essential for safe and effective lighting installation.
Several factors contribute to the selection of an appropriate ceiling light mount bracket. These include the weight and size of the light fixture, the type of ceiling material (drywall, plaster, concrete), and the electrical box configuration. Choosing the correct bracket ensures the light fixture is adequately supported and prevents potential hazards.
Ceiling light mount brackets are typically categorized based on their design and function. Common types include:
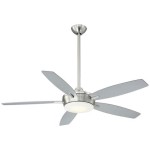
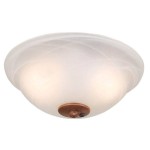
Standard Brackets: These are versatile brackets suitable for most common light fixtures. They feature a circular or rectangular mounting plate that attaches to the electrical box and a threaded nipple or crossbar for securing the fixture. Standard brackets are typically used with lighter fixtures.
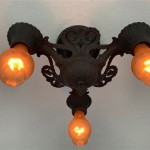
Heavy-Duty Brackets: Designed for heavier chandeliers, pendants, and other substantial fixtures, heavy-duty brackets provide enhanced support and stability. They often incorporate thicker metal and reinforced construction to handle the increased weight.
Extension Brackets: When the electrical box is not ideally positioned, extension brackets bridge the gap. They offer adjustable lengths and angles, allowing the light fixture to be centered correctly, even if the electrical box is offset.
Sloped Ceiling Adapters: For angled or vaulted ceilings, sloped ceiling adapters compensate for the incline, ensuring the light fixture hangs vertically. These adapters adjust to various angles, ensuring proper light distribution.
Recessed Light Brackets: Specifically designed for recessed or can lighting, these brackets secure the housing within the ceiling cavity. They often feature adjustable clips or springs to accommodate different ceiling thicknesses.
The materials used in ceiling light mount brackets directly impact their durability, strength, and corrosion resistance. Common materials include:
Steel: Steel brackets offer high strength and durability, making them suitable for heavier fixtures. Steel brackets are often coated or plated to prevent rust and corrosion.
Aluminum: Lightweight and corrosion-resistant, aluminum brackets are a good choice for lighter fixtures, especially in damp or humid environments. Aluminum offers good strength-to-weight ratio.
Plastic: Plastic brackets are typically used for lighter fixtures in non-critical applications. While less expensive, plastic brackets may not offer the same level of strength and durability as metal options.
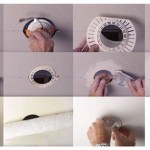
Proper installation of a ceiling light mount bracket is paramount for safety and functionality. The following general steps outline the installation process, though it's always recommended to consult the manufacturer's instructions for specific guidance:
Turn off the Power: Before beginning any electrical work, always turn off the power at the circuit breaker. This is a crucial safety precaution to prevent electric shock.
Prepare the Electrical Box: Ensure the electrical box is securely attached to the ceiling joist and is properly grounded. If necessary, replace or repair any damaged components.
Attach the Bracket: Secure the mounting plate of the bracket to the electrical box using appropriate screws. Ensure the bracket is flush with the ceiling surface.
Connect the Wiring: Following local electrical codes, connect the wiring from the light fixture to the wiring in the electrical box. Use wire nuts to secure the connections and ensure proper polarity.
Mount the Light Fixture: Attach the light fixture to the bracket according to the manufacturer's instructions. Ensure all screws and fasteners are tightened securely.
Test the Connection: Restore power to the circuit and test the light fixture to ensure it is working correctly.
Beyond the standard types, specialized brackets cater to specific lighting needs. These include fan-rated brackets for ceiling fans, which are designed to handle the added weight and dynamic forces generated by a rotating fan. Low-profile brackets minimize the space between the ceiling and the fixture, ideal for rooms with low ceilings.
When selecting a ceiling light mount bracket, considering factors such as safety certifications (UL listing), compatibility with the fixture and electrical box, and the aesthetic appeal can ensure a secure, functional, and visually pleasing installation. Regularly inspecting the bracket for any signs of wear or damage is also a good practice to maintain the safety and longevity of the lighting system.
Understanding the nuances of ceiling light mount brackets empowers individuals to make informed decisions when installing or upgrading their lighting systems. By considering the factors outlined above, one can ensure a safe, secure, and aesthetically pleasing lighting installation.

Mounting Light Fixtures Fine Homebuilding

Mounting Light Fixtures Fine Homebuilding

Canopy Bracket Lighting 100mm Ceiling Plate Pendants Lights

Project Source 4 In Silver Metal Ceiling Light Mount The Mounts Department At Com

Whole Iron Ceiling Light Fixture Mounting Bracket Pandahall Com

Uxcell Ceiling Light Plate Lighting Fixture Mounting Bracket 4 1 X0 71 67 L W H 8pcs Com

Project Source 5 In Silver Metal Ceiling Light Mount The Mounts Department At Com

4 5in 115mm Crossbar Bracket With Ground Wire Kit For 7in Ceiling Canopies Diy Lighting Lamp Parts Pendant Light Fixture Components

Custom Oem Galvanized Steel Pendant Ceiling Lamp Mounting Bracket China Light Fitting Made In Com

Next Glow Ultra Slim Luxurious Edge Lit 7 In Square Black 3000k Led Easy Installation Ceiling Light Flush Mount 1 Pack Ng2180 The Home Depot
Related Posts