Essential Aspects of Changing Recessed Ceiling Lights
Recessed ceiling lights are a popular choice for illuminating homes and commercial spaces due to their sleek, unobtrusive design and energy efficiency. However, over time, these lights may need to be replaced for reasons such as flickering, dimming, or burnout. Changing recessed ceiling lights can be a relatively straightforward task, but it requires careful attention to safety and proper electrical wiring. This article will guide you through the essential steps involved in changing recessed ceiling lights, ensuring a safe and successful replacement process.
Safety Considerations
Before beginning any electrical work, it is imperative to prioritize safety. Turn off the power to the light fixture at the circuit breaker panel. Verify that the power is off by using a non-contact voltage tester to ensure there is no active electricity. Wear appropriate safety gear, including safety glasses and gloves, to protect yourself from potential hazards.
Removing the Old Light
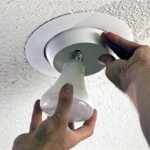
Once you have ensured safety, locate the trim around the light fixture. This trim is typically held in place by springs or clips. Carefully pry the trim away from the ceiling, being mindful not to damage the surrounding drywall. Once the trim is removed, you will have access to the housing unit that contains the bulb and electrical connections.
Inside the housing unit, you will find the electrical wires connected to the light fixture. Disconnect these wires by loosening the terminal screws and gently pulling them away from the light fixture. Next, locate the spring clips that hold the light fixture in place and compress them using pliers. Carefully lower the light fixture out of the housing unit.
Installing the New Light
Before installing the new light, inspect the housing unit and trim for any damage. If any damage is found, it should be repaired or replaced before proceeding further. Position the new light fixture into the housing unit and secure it by releasing the spring clips. Ensure that the light fixture is properly aligned and does not wobble.
Connect the electrical wires to the light fixture by inserting them into the terminal screws and tightening them securely. Ensure that the wires are firmly connected and there are no loose strands. Push the excess wire back into the housing unit, leaving enough slack for future adjustments.
Finishing Touches
Once the light fixture is wired and secured, carefully tuck the excess wire back into the housing unit. Reattach the trim to the ceiling by aligning it with the housing unit and snapping it into place. Turn on the power at the circuit breaker panel and test the light to ensure it is functioning correctly.
Additional Tips
- If you encounter any difficulties or uncertainties during the replacement process, do not hesitate to consult a qualified electrician for assistance.
- When selecting a new light bulb, pay attention to the wattage, color temperature, and beam angle to achieve the desired lighting effect.
- Regularly inspect your recessed ceiling lights for signs of wear or damage, such as flickering, dimming, or discoloration, and address any issues promptly.
By following these steps and adhering to safety precautions, you can effectively change recessed ceiling lights and maintain the functionality and aesthetics of your lighting system.

Easy Ways To Replace An Led Recessed Light Bulb 13 Steps

How To Replace Recessed Lighting With Led The Home Depot

How To Replace Recessed Lighting With Led The Home Depot

Easy Ways To Replace An Led Recessed Light Bulb 13 Steps

How To Change A Recessed Light Bulb

How To Remove Recessed Light Cover Without Any Damage Brightest Lumen

How To Change Downlights Or Recessed Lights In False Ceiling Electrician Singapore Recommended Services

How To Replace Recessed Lighting With Led The Home Depot

How To Change A Recessed Light Chandelier Thrifty Decor Diy And Organizing

How To Replace Recessed Lighting With Led The Home Depot
Related Posts